Friday, June 24, 2016

More of the same...

...you know, those same three colors.

After my last post I realized that this weekend is our big family reunion on my Dad's side. They have a fund raising auction each year to cover the cost of meals and park rental. Traditionally I have taken a small patriotic quilt to the auction and I hadn't begun to make anything for it yet.
Little finish #31 for the year.
This is my adaptation of a pattern by Diane Hansen in BH&G recent Make It Mini magazine--I believe it is called Patriotic Star. The original has flying geese around the edge, and no border, but I wasn't sure if I had time to do the flying geese. Silly me--I underestimate the power of oral steroids to keep me awake all night long!

Not only did that get finished, but these as well.
Aside from the feathers in the border on the one immediately below, the rest of these were all stitched with straight lines.
#32

#33

#34

#35

Now all of these little quilts are nestled in their home, as intended.
There is still one empty slot in the letter holder. But never fear, there are more little R/W/B quilts awaiting a finish. No surprise there, right? : )

The question that remains is, which one will get finished first, or in other words, which will be little finish number 36 for 2016? Will it be one of these two?
The little row of flags on the right is an adaptation of "Freedom Flag", a recent pattern offering from Temecula Quilt Co.

Or will this be crowned #36 of 2016?
Have begun to sew the rows of the TATW on the grid. Hoping for the best. The other little quilt on the grid does not seem as bulky now that it is quilted.

For the answer to this and other burning questions, don't hold your breath! : )
Until next time,
Janet O.


Saturday, June 18, 2016

Seeing red...and white...and blue (and a product review, a very loooong product review)

If you have followed me a few years and have seen my other red/white/blue posts (here and here), you may be thinking, "This woman does not need more r/w/b quilts".  You are probably right. So how do I justify these...

...and these?

Well, she went home to Oregon. (Oh, her Mom left, too--sorry, Ang.) 
I had to do something to drown my sorrows.
Time with the local grandkids has helped, and we have had a lot of good times this week.


But when I have been home alone (which, I admit, has been rare), the sewing has been frenetic. Being on a short course of steroids has helped add to the feeling of frenzy. I don't do well on those things!!


I wanted a few really little r/w/b quilts to display in the letter holder from a few posts back. I pulled r/w/b pieces from the scrap baskets. It started with some simple r/w 4 patches, and this was the first result.


Had lots of squares and 4 patches left over.


Then I got the bright idea to try a new-to-me product by Quiltsmart--fusible grid.
I had actually seen this demoed at a trunk show by Carmen Geddes a couple of years ago, and at HMQS I bought some of the 1" finished grid from Carmen's booth. But my friend, Kris, got some of the 1/2" finished grid for when she vends at quilt shows, and I bought a few panels from her. 

I decided on a trip around the world, so I cut bunches of 1" squares (what happened to using the squares that were left from the first quilt? They were too big) and placed them on the grid.
Once I got to this stage I got a little chicken. I decided to test it out on a smaller project first. So I took some of the leftover squares and made up this nine patch mess.


Pressed it well and it was adhering well.


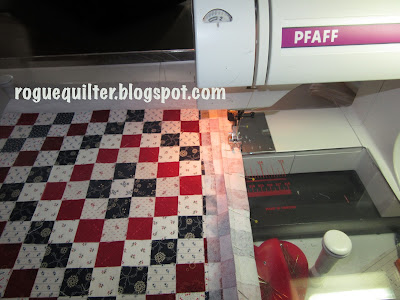
Next, as per the online instructions, I folded it along the dotted lines and sewed 1/4" from the fold. 
I think pinning helps maintain the straight edge of the fold.

When all of the rows are stitched in one direction, you get this.

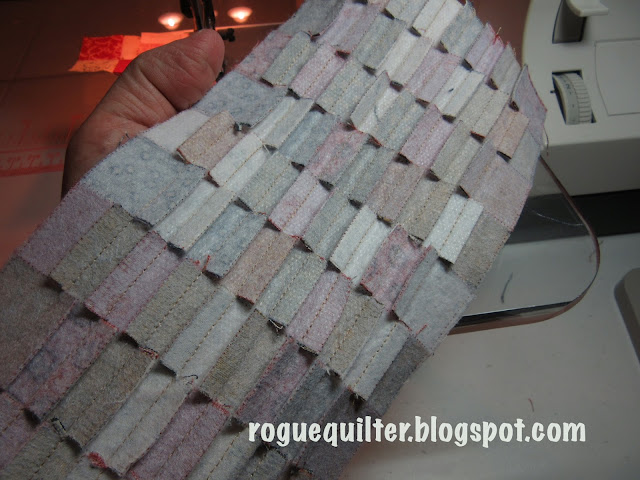
Now you clip up to each seam on the dotted lines.

And press each row in alternating directions. I don't have a tiny Clover iron, so this was tricky.

Now you fold and stitch along the lines perpendicular to the ones you have already stitched. If you have followed directions, the first seams nest very neatly against each other. Pretty slick.
I still felt pinning was helpful to keep things straight.

This was the finished product. I must admit, there is a lot of bulk  for such small squares (1/2" finished), and it didn't want to lay flat, even with starch and lots of muscle in the pressing.
It had a tendency to want to retract like an accordion. : ) 

I even trimmed the second row of seams down to 1/8" to reduce bulk, but I'm not sure that helped any.

It probably would have been okay after quilting, but I decided to attach borders to help stretch it and keep it flat.
Here it is pinned to my design wall with a binding audition taking place.


Back in Oct 2014, when I attended Carmen's trunk show, she shared some minis she was making using the 1" finished grid. I was able to handle them  and felt that they were still supple and there wasn't undo bulk.


But the 1/2" finished grid seems to be a different story. I am not giving up. Maybe I needed to trim the seams going the first direction, too. I will give it some thought, and hope that if you have any experience with the tiny grid, you will give me your suggestions.
For now, this will stay on the wall. I am not ready to tackle it yet.


Now I had lots of leftover squares in two different sizes. I can't tell you the number of times I arranged and rearranged this to make it balance (so much more obvious on mini quilts than on big quilts), and use all of the blue/white 4-patches (1" finished) I had created from the small leftover blue squares.

I still had LOTS of r/w 4 patches left from the first little quilt. By now I was very tired of the way each quilt was producing another one (for a fun post on that very subject, see Mrs. Goodneedle's post here).


I decided to just sew the 4-patches together, on point.

And then I just randomly put the other leftovers together.May have to tea-dye this one to even out the background tones.

I seem to be determined to keep myself from catching up on quilting all of my little quilts. These are going to have to get very simple quilting so I don't get too backed up again!

Oh, wow. I have been creating this post a little at a time through the day. I just saw how long it has become. Yikes!! I am too wired from the meds to go back and edit it down. So sorry!
If you have used the tiny Quiltsmart grid, please let me know your experience.
Until next time, Janet O.

Tuesday, June 7, 2016

Just a Quick Note

...to let you know that I am changing my email address. If you are trying to contact me via an address saved in your system, it will not work. My profile page shows my new email, and my comments are linked to it as well. 

Mostly family time going on lately, but I did stitch up the last little English Ivy block from the class I took with Marsha McCloskey last September. These blocks finish at 3".

In the publication "In War Time" by the American Quilt Study Group I found a photo that has inspired me as far as a setting for these blocks goes. It won't be an exact replica, but will be "inspired by."

And I did end up finding a coral print in my stash that did it for me. The brown fabric went down in flames, as far as the popular vote went (I agree). Blue got a lot of support, but there was not enough of the only blue that seemed to be the proper tone.
Coral was definitely the favorite, and after an email from Roxanne I was encouraged to revisit my stash. I found a tonal coral that had been folded too small and was passed over the first time around. It is in the final stages of being stitched down on the back. I am happy with it--and this will be finish #30 of small quilts for this year.


Now, back to family. Only have these two here for 4 more days!

Until next time,
Janet O.