Friday, December 31, 2021

December Monthly Mini

Wasn't sure I could pull it off this month, but just this week I got this put together. The stars finish at 6", so it isn't as "mini" as many I make, but I enjoyed putting this together. It finishes at 18". I am linking up with Wendy at The Constant Quilter blog for the monthly mini parade. Check them out. Is this the fourth year we have been doing the monthly minis?

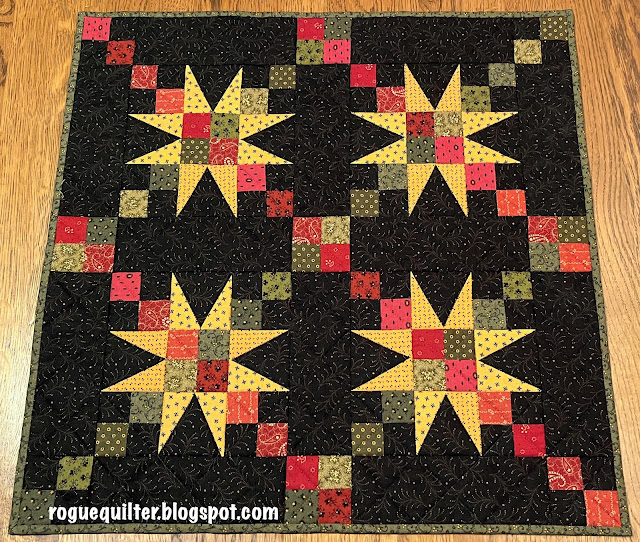
This may look awfully familiar because the color scheme is almost the same as last month's mini. I just added green this month in honor of the holiday season.I had toyed with the idea of a red binding, but when I tested reds against the finished top, they seemed to take away from the gold stars.

You can see the quilting, which was a mix of diagonal lines and stitch-in-the-ditch, in the photo below.

Friend Kathy knows that I don't enjoy switching threads (which she loves). But I do it sometimes because I think it will be the best look for the quilt. So as I was auditioning thread colors, I thought of Kathy and the photos she takes of  her pretty bunch of spools laying on the quilt. I took the photo below in honor of Kathy. :)

This was taken post-quilting, but pre-binding. I had just cut the binding strips and laid them around the edges. The reds in this photo are brighter than in real life, but the other colors are truer than in the first photo.

It may be a stretch, but this quilt is for my "baggie challenge". These fabrics weren't in a baggie--they have been sitting in a project box for years. I was taking a class from Marsha McClosky and I had the reds/greens/golds (along with a few neutrals) in my project box for the class. When I got to class I learned that we had the option of making the blocks in miniature, which, of course, I chose to do. So I had a LOT of fabric leftover, and it has been marinating in the box for years.

The challenge allowed for the addition of two fabrics--a neutral and a color. Black was my neutral in this quilt, so I added the black in the center column. The color I added was the red in the front of the left column. It had arrived at my home two days before Christmas in a baggie of "scraps" from my retreat buddy, so I felt it belonged in my baggie challenge piece.

In January I will do a post where I will link up all of the monthly mini makers who chose to participate in my baggie challenge. I will draw a name to receive one of the quilts I have made from baggies of scraps in the past. I may have a few other prizes for some lucky participants, too.

I hope you had a lovely holiday, whether you were surrounded by friends and/or family, or celebrated quietly. We had a unique Christmas Eve/Day activity. Our DIL is an artist by profession. She offered to give us all a chance to try our hand at painting with acrylics on canvas. She put a LOT of work into it, and transformed our living room into a classroom. 

She had invited us to bring a picture or object that we wanted to use as our inspiration, and then she gave us a session of instructions. We were then set loose to try our hand, as she moved among us giving help and suggestions as needed.

Some family members have natural artistic talent and the rest of us were out of our element, but had a good time. We spent hours on Christmas Eve working on our paintings, and those of us who hadn't quite finished up spent a few more hours on Christmas Day.

Here we are on Christmas afternoon with our mostly finished pieces, and our proud teacher. Our granddaughter (front and center) had started two pieces, so neither was completed yet. Our oldest son (married to our teacher, and standing on the far right) was doing a more involved piece, since he has had private lessons already, and he still had more to do. Hubby is absent from the photo as he chose to spend the time with our youngest grandson who has disabilities that prevent his participation. Our oldest daughter and her family remained in Oregon for Christmas, so they are missing as well.

It was a stretch for some of us who are artistically challenged, but it was fun to try something new!

We celebrated New Year's Eve just the two of us this year. We usually have some family and/or friends over. But hubby had his second dose of the Shingrix vaccine yesterday and he has been feverish, achy and coughing. So we had no guests and hubby went to bed early. I just finished up New Year's Eve with my usual routine, watching the classic movie, "Bachelor Mother", starring Ginger Rogers and David Niven. Love that movie! As midnight strikes I can look out the French doors of our family room and see fireworks going off from one end of our valley to the other. As much as I enjoy fireworks, I always worry for all the people and animals that are traumatized by the noise.

May you enjoy a wonderful start to the new year, and may we make it a kinder, healthier year for us all. 

Until next time,

Janet O.

I leave you with the photo that was the inspiration for my painting attempt. This was taken just outside those family room French doors as the full moon rose over the Bear River Range of mountains on December 18th.


Saturday, December 18, 2021

The Stockings Were Hung...

...on the Shaker peg rack in the kitchen, because I don't have a mantel. :)

This is the sum total of my sewing since my last post over 2 weeks ago.

DD#1 reached out a couple of weeks ago to see if I would have time to make stockings for her 3 family members. How hard could that be, I wondered? Even the fact that she wanted each one a different patchwork design made out of recycled men's shirts didn't deter me. And in order to make sure she would receive them before Christmas Eve, I had two weeks to complete them.

She was kind enough to link me to the excellent tutorial at Cluck, Cluck, Sew, which gives great instructions for the method, but has no pattern. I used a shape from a pattern my other daughter still had from a class she had taken with her sister many years ago. The tutorial also tells you how to adapt the double hourglass block in another of her tutorials to make a small block for the stocking. My daughter loved that design, so of course, I had to make one. Keep in mind that I only had 2 weeks in which to finish all three stockings. That double hourglass stocking took every spare minute of that first week! I had to simplify!

The next design I attempted was the chevron design created with HSTs. This went much faster. From cutting to having the stocking front and back sewn together, it was finished in one day. I didn't attach the cuff, hanging loop, and lining until I had  the name and holly stitched on the cuff.

The final stocking was the alternating pinwheel design. It took two days of my sewing time to create. Without a pattern that specifies the stocking shape and how many blocks on each row--or even what size blocks, I would just make blocks and lay them out, place the pattern over it and see if everything was covered. I would try to take into account the shrinkage that would happen when it was all sewn together. But sometimes I missed my guess and had to add a row, or add blocks to the ends of rows as things came together. After 1 1/2 weeks the three stockings were created, but the cuffs needed finishing.

I spent whatever sewing time I could scrounge over the next couple of days getting names and holly stitched on the cuffs and assembling all the parts to complete the stocking. I made it within the two weeks, but just barely. 

I never would have made it without my new best friend in my sewing room, an Accuquilt Go!Big cutter. This was gifted to me early in the year (THANK YOU--you know who you are!). With Mom's needs, and then her passing, and my husband's retirement and our "retirement trip", it took a few months before I was really able to play with it and get a feel for what it can do for me. I am using it on several projects that are in the works, and on these stocking I used it to cut all the 1 1/4" strips for the double hourglass stocking. The 2" finished HST die cut every triangle for the Chevron pattern, and I didn't have to square up a single block. Using the 2" finished square die and the 1" finished HST die, the final stocking went together so smoothly and, again, I didn't have to square up a single pinwheel block. 

If you want to attempt making patchwork stockings, I highly recommend the links above--but maybe give yourself a little more time to get them finished--like next Christmas! :)

In the midst of all this stocking mayhem, we held meeting #2 of the Tiny Club at Village Dry Goods. Lynn has outdone himself in coming up with creative ways to make a 3x3 grid out of 2" finished blocks. Look at what he shared with us this time.

Some of you have already contacted Village Dry Goods about getting Lynn's rulers and patterns. They are trying to accommodate those who want to purchase them, so check the link above and get in touch with them, if you would like to join this mini madness!

Lynn had very concise "storyboard" samples of each of this month's four new blocks. Though I haven't had a chance to try making any of them yet, I am really anxious to see what I can do.


Recently I heard a more succinct version of the old familiar saying, "If you can't say anything nice, don't say anything at all." This one is simply, "If you can't be kind, be quiet." We could use a whole lot more of both--kindness and quiet!

My prayers and thoughts are with those whose lives were devastated by the tornadoes. 

Until next time, 

Janet O.

Leaving you with another recent sunset, captured on a brief, chilly walk a few evenings ago.


Thursday, December 2, 2021

November Monthly Mini and Celebrations

It can't be December yet. I haven't posted my November mini! So here it is.The top was finished a couple of weeks ago, but birthday celebrations and Thanksgiving kept me from getting it quilted and bound until now. This finished at 14". I will link up here with Wendy, The Constant Quilter (she really is), for our Monthly Mini listing.

The color is not accurate here, but this gives you a bit of a look at the quilting. There really needs to be some stitching in the larger HSTs, but I want it to be hand quilting, so that will come later.

The machine quilting shows up better in this photo of the back. I kept it as simple as possible, because I was so far behind. I had thought about feathers, but had to pass on them this time.

The colors in the quilt were inspired by a stunning monthly mini made by Gladi (seriously, all her quilts are stunning) back in September, which you can see on her blog here. I was smitten by her quilt, and knew I wanted to copy her colors. I was just getting ready to join in on Pam Buda's Quilt Archeology doll quilt, Dear Prudence, when I saw Gladi's post, and I knew I would transfer that color palette over to Pam's design. 

Pam's pattern was for a larger doll quilt than this. I cut all the parts for the whole quilt and then realized I had made a major error and had cut everything wrong. That is what I get when I work too late at night. I had to cut things down for each block. After reworking 6 blocks, I'd had enough. I chose 5 of the six blocks and made a smaller version of Dear Prudence.

As I had worked on this little quilt I was sure I had used this palette before. I finally realized where I'd used it when I sat down to Thanksgiving dinner. The first quilt I'd made with these colors was hanging in our dining room. This was a SAL at Humble Quilts blog, where Lori had us choose an orphan block and the SAL was the process of adding the borders. It was called "Faithful". Here are the two quilts together, with my hand in the photo to give size perspective.

I hope all my friends in the U.S. had a lovely Thanksgiving last week. We had planned on having 7 or 8 family members for dinner, which is small for us. But Thanksgiving morning our youngest son, who was visiting with us for the holiday, was informed that he had been exposed to COVID the night before. We had no other family come, under the circumstances, and we just had 3 for dinner. But I have to say, no matter how few will be eating, it still makes a mess to prepare it. 

My birthday usually falls in the same week as Thanksgiving, and often gets swallowed up by the preparations. In such cases we try to celebrate a week early. Happily, hubby gifted me with tickets to a Van Gogh immersion experience available in Salt Lake City the week before.

It was incredible. Words can't convey and photos don't quite do it justice, but I will try to give you a taste. I understand there are different versions of this experience across the country, but the idea is similar. There was a photo op just inside, where they offered to take your photo  with your phone. There were four different rooms of this experience, but the last one is where you spend the bulk of your time. You can click on any of these photos to enlarge them.

In the experience on the left, above, all of the water glimmered. In the picture on the right, if you watched closely, you might catch a self-portrait blinking. And in the portraits where he was smoking a pipe, the smoke wafted from the barrel of the pipe.

I took video of some of the experiences, but the files are too large to upload. I'll try to give you an idea of what was going on. Keep in mind that there is effective mood music  going on during the whole thing.

On the left was the beginning of this picture. Then the petals started fluttering around the room until it felt you were in a snowstorm of flower petals, as on the right. Then the petals began to disappear, and there was a whole different painting on the walls behind them.

At the beginning of this painting experience the room was dark. Then the swirls began to move about the walls. They continued to move and expand until it had finally become "Starry Night." Each time the paintings changed, the transition was different. 

I would say if you get the opportunity to attend, it would be well worth it.

I am humbled by the number of "mini-acs" who are participating in my Baggie Challenge. If you haven't seen their amazing quilts, check the links in Wendy's post and see what everyone has made. I haven't made my Baggie Challenge quilt yet, but plan to do it this month--after I get some Christmas gifts made!! Oh, it is coming quickly!

Hope you are finding ways to spread joy, and stay safe.

Until next time, 

Janet O.


Leaving you with this sunset from last night. The hazy sky from the inversion provides a bit of a glow spilling over the mountain top. This photo was taken from my sewing room window.

Saturday, November 13, 2021

Lori's SAL and The Tiny Club

This is what I made for Lori's (Humble Quilts Blog) "Land That I Love" SAL. I haven't had a chance to quilt it, or name it.  

When Lori announced the SAL I was really in the mood to use fall colors, so I rummaged through bags of HSTs and my scrap basket under my cutting table and came up with everything for the blocks. The setting triangles and squares were cut from a FQ.

I keep telling myself I am going to hand quilt it, but it hasn't happened, so maybe I just need to machine quilt it and have it finished. And if someone has a name idea, I would love to hear it.

Now, just what is The Tiny Club, you may be wondering. Well, the wonderful quilt shop over the mountain, Village Dry Goods, is offering a series of 3 classes taught by Lynn Hopkins. It is all about 2" finished blocks. 

In the background you can see Lynn giving instructions. In the foreground is one of his custom rulers and patterns

Lynn has custom designed rulers that allow you to make precise 2" finished blocks based on a 3x3 grid--and that is no simple task. At each class he gives us patterns for 4 blocks, and demonstrates what we need to know to experience success. Below are some of the blocks he has made, and some of his quilts.

In the two photos above you see many of his 2" blocks. My hand in the photo on the right gives you a bit of size perspective.


 The blocks shown to the left are all made from silk ties--and they finish at 2" just like the others. If you have ever worked with silk, you know how hard it can be to keep it from slipping and sliding. Then, to make things this tiny and preserve accuracy is insane.  


Below you see a collection of Lynn's little quilts.


To the right is Lynn's Jacob's Ladder mini quilt, made from 2" finished blocks, of course.


And then we have the masterpiece! Look at this incredible quilt--all the little blocks within it finish at--what else? Two inches!!

I was so inspired afterward that I came home and made a few blocks myself. Five of them were from Lynn's patterns and the others were from my own patterns for 2" blocks. Mine are mostly based on a 4x4 grid (much easier to do than the 3x3 grid). I am doing them all scrappy from the fabrics in the basket under my cutting table. Someone's got to use them. :)

Today (November 13, 2021) was World Kindness Day. I hope you were able to find a way to surprise someone with kindness, whether you knew about the designation or not.

Until next time,

Janet O.


Sunday, October 31, 2021

October Monthly Mini

I hadn't planned on making a Halloween mini, but when I was sorting through some Sandy Gervais Fall fabrics I've saved from years ago, I came across a small pile of Halloween themed fabric tucked in among them. And this was born. It is about 8 1/2" square. I think I will name it "Boo Who?" If you look closely you will see that much of the fabric has "boo" printed on it.

Linking up with Wendy (The Constant Quilter blog) where all good mini-acs go at the end of the month.

The hyper-quilting of the spider webs in the setting triangles makes the blocks poof out. On a normal quilt I might not like that effect, but for a Halloween quilt it somehow seemed appropriate.

I don't usually use holiday themed fabrics for holiday minis (I usually use holiday colors in my good old repro fabrics), but I couldn't resist seeing what I could create from these scraps that were passed on to me by another quilter. I added the orange for the setting triangles (from an old Primitive Gatherings line), and for the back I chose a piece from a bundle my Mom once picked up years ago at a yard sale. You can see it in the photo below.

Though this was not my "Baggie Challenge" mini, it could probably qualify. I have set aside a baggie of scraps that I intend to use for that, but it may be December before I get it made.

In the meantime, I am ready to start quilting my "Land That I Love" from Lori's (Humble Quilts blog) doll quilt SAL. And I have almost finished the piecing on Pam Buda's "Dear Prudence" doll quilt SAL (Heartspun Quilts blog).

My design wall is currently covered with this project--my version of Gay Bomer's Heartfelt BOW. None of it is sewn together yet.

The lighting doesn't show how purple this really is, but I think you can still see the pops of cheddar I had to add. Since I don't applique, I left out the center medallion and set my blocks on point with triple sashing and 9-patch cornerstones. Once those are all made and this is assembled, I may add a couple of borders to make it queen size. Such a novelty for me to make a quilt that actually covers a bed. :)

Funny story for you--are you familiar with Pinewood Derbies? Around here they are usually associated with cub scouts, but our church had one as an activity last Wednesday, and beforehand they had encouraged families to create derby cars together. They brought in a specialist with a fancy track that electronically determined the place of each car in each heat, and each car raced in several heats to determine the final place they earned. Hubby and I made a car together (the only old people who did). He cut and sanded a simple, aerodynamic wedge shape. I painted it, and he attached wheels and weights. We took 4th place against all the young people who entered cars in the "classic" division. No one had trouble telling our car from the others.

Until next time, I'll leave you with the view of the setting sun on the mountains as I was going into the church for the Derby.

Janet O.

Tuesday, October 12, 2021

New England Visit--Part 3B

This post is about the "other" show that was at the New England Quilt Museum when I visited in August. (I can't believe it has taken me this long to share everything of a quilty nature from that trip.) Along with the wonderful Quilt Japan show that I have shared, there was also a one-woman show by Kathy Metelica Cray. Before going I had read about this show and was really looking forward to the opportunity to see her quilts.

In the artist's own words...


I love the concept of her quilts. And since I have 2 or 3 sets of vintage blocks in my sewing room closet, I may have to give it a try someday. With that foundation, you are ready to see the show. I haven't included everything, but pretty close. Here goes!


(I have to say that this may be my favorite--the butterflies, the black and the happy colors--though it isn't in my normal comfort zone, it sings!)


I hope you enjoyed this. It was so inspiring to me! And this wraps up what I planned to share with you about my trip to New England.

Until next time, be gracious and thoughtful, and brighten your corner of the world.

Janet O.