Sunday, August 31, 2014

A Lamb For All Seasons *

I'm sure you are all familiar with the free Old Glory Gatherings pattern from Primitive Gatherings.

After making mine, you may recall that I made a Christmas version for a small quilt swap with Gayle (The Middle Sister blog). This summer I had been thinking I needed to make one of those to keep. Well, that got the wheels in my head turning, and this is what resulted.

This one needs something. I am thinking about brown wool circles behind light ones.


 Nothing is final on these yet--nothing fused or stitched down. The wool pieces are not positioned exactly yet. The little lamb above doesn't really have a leg dragging behind. : )
There may be some other little elements added to these basic designs. I'm playing with some possibilities, but it won't be anything major on any of them--just little touches.

I'm almost caught up on the Primitive Gatherings 10th Anniversary SAL. Just need to stitch around the wool applique in the corners.
I am really liking this so far. I do wonder if I am going to have enough of the coordinating fabrics and wools to keep going as the rounds get bigger. 

Got one more mini Burgoyne Surrounded block made. The little 2 1/2 inch square ruler may help give you the size perspective. There will be sashing and 9-patch cornerstones between blocks.
Went to a sale at an almost LQS Saturday morning and got a few more small print blacks to use in the rest of the blocks. Four down, eight to go! No, Julie, I am not making a bed size quilt out of these little blocks, much as you want me to. : )

This little quilt of 2" pineapples finally got quilted. I made the top for that trunk show in May. It finishes at 9"x11".
The binding is only pinned down on the back. Purple may not have been your color of choice for the binding, but it was mine, and I love it! I've named this Pineapple Tidbits.

I've added another little quilt to my wall of quilts made by friends. I may not have shown the last couple, so I will need to get an updated photo soon. This little quilt was made from a Lucy Boston Patchwork of the Crosses block that is so popular around blogland, so I thought you might like to see how sweet one block looks all by itself.
This was made by my friend, Carole. The colors are much richer (Kansas Troubles fabric), but I took it with the light shining across the surface so you could see the great texture of the quilting. It is beautifully made! Thank you so much, Carole. I love it!

There is more to share, but this was long enough. I'll save some for later. Until then,
Janet O.

*No disrespect intended to the book or movie "A Man For All Seasons." I own both and I really love the message of integrity and commitment in the story. But I couldn't resist the play on words for this title. That may reflect poorly on my integrity.

Sunday, August 24, 2014

Progress report of an easily distracted quilter.


Two little quilts are finished.
From a 9-patch SAL at quiltsbycheri blog. I think she called it "Gathering Patches." She made 3 different 9-patch quilts. I only made the first two. This one has been a flimsy for quite a while. I may tea-dye it. Haven't decided yet, for sure.


This was one of the many little quilts I made in my one-patch frenzy earlier this month. Just got it quilted and bound.


And speaking of the one-patch frenzy--the smaller quilt in this photo is the last of the little one-patch quilts that I had laid out on a design board. Very random scraps. I hadn't machine quilted for a while, so I used this as a warm-up piece before moving on to quilt "Market Day" (the larger quilt in the photo, from Pam Buda's SAL). Yes, Kris, I kept that border fabric on Market Day. After three quilt shops and nothing I liked better than this, it stayed!
Both of these just have the binding pinned down, waiting for hand stitching.


The back of Market Day is a repro of a great old patriotic print that I received from Barb Vedder (Fun with Barb blog), whom I consider queen of the cool backing fabrics!

I am working on getting caught up with Lisa Bongean's 10th Anniversary SAL. (Click the links on her sidebar for the patterns)
I chose to do the light border in one print, rather than a collection of scraps. The flying geese will go all around, eventually. I am just taking one side at a time, doing them by paper piecing. I have a hard time getting  lots of flying geese in a row to end up the size they are supposed to be, so I opted to take this route, and it is slow going. The corners will have little wool appliqued flowers.

And I got one more little block (finishes at 3 3/4") made in my mini version of Lisa Bongean's version of the APQ SAL. I have the strips cut for more. Hopefully I can add one or two blocks this week


Finally, the big quilt is progressing. (Yes, I do make big quilts, too.)
Three of the rows are made--two more to go. Then a couple of borders and the hardest part of all--how to quilt it? I'm open to suggestions. : )

Until next time,
Janet O.

Saturday, August 16, 2014

The Making of a Mini Quilt

Did you see  Lisa Bongean's version of the APQ QAL posted in July? I was smitten with it. Burgoyne Surrounded has never grabbed me before like this one did. When browsing through some Miniature Quilts magazines one day, I came across a pattern for it in miniature (ETA--issue #11, Fall 1993), in red and white. I began toying with the idea of doing Lisa's colors in this miniature size. What clinched it was a Fat Eighth bundle that arrived one day from my sweet blogging friend, Julie at JulieKQuilts. It was blacks and golds. I put the magazine with the fabrics and it sat for a few weeks. As I have been doing some repetitive, boring piecing lately (still putting star points on my Garden Maze sashing), I wanted something fun as a leader/ender. This little quilt fit the bill. I have these two blocks made so far. It doesn't go together very quickly, but it isn't hard.
The hardest part is that the directions are for a red/white quilt, so I have to sub the black for the white, and then figure out if I am needing to sub the tan or the gold for the part that says "red".
I will be doing 12 blocks, using 6 different blacks to make two blocks each. The tan will all be the same throughout, and the gold/oranges will be scrappy.
Each block will finish at 3 3/4". Aren't they cute?
I've had lots of questions about how I make the mini quilts. I am no expert--many of you have made them far longer than I have. But for those of you who are like I was two years ago when I was first dabbling in minis, I will share a few tips.

Foundation paper piecing yields very accurate results, but I won't be addressing that method here. I still don't like removing the papers, but I use this method often for minis, because it is so precise.

When NOT using foundation piecing, here are some of the things I do.

Mini Quilt Tips

1. Make sure you are sewing with an accurate 1/4" seam. Being one or two threads off can make an obvious difference when dealing with such tiny pieces.

2. Pin profusely! I am not one who generally pins things together before sewing when working on large quilts, but I am completely opposite with minis. Keeping pieces perfectly matched up as you sew is critical with little blocks. I use slim, glass-headed pins, and I actually sew over them much of the time.

Which brings me to my next tip...

3. Slow down! If you are a speed demon, this may be difficult for you, but sewing at a slower rate allows you to maintain control and keep the seams straight. This is so much more obvious when going small. It also allows you to sew over slim pins, which keeps seams matched up.

4. Press consistently. With larger quilts I often just finger press my seams until I get a block finished, but with these small pieces, they don't finger press very well. Sometimes it even takes a damp press cloth with the hot iron to get a seam to flatten.

5. Square up each of the units as you go. If you are making HSTs or 4-patches, or 9-patches, etc., to go into blocks, square them up before assembling the blocks. Again, if you are off a thread or two it can make a big difference in little blocks. Where possible, I make the units a little larger and trim them down. This works great for HSTs and 4-patch blocks, but not so much for 9-patch blocks.

6. Trim seams where needed. For many patterns I leave my seams at 1/4", but when working with very tiny pieces (like the 3/4" 9-patch blocks above), the 1/4" seams in the middle of the block have nowhere to go if they stay 1/4". They just pile up in the back and create bulk. In such a case, I trim them to 1/8" as I go. Some people just sew 1/8" seams, but I find that more difficult to keep even.

7. Even if you take all of these precautions, be prepared for a little bit of wonkiness--and embrace it! When working on a small scale, every wobble will show, but it is part of the charm of tiny quilts.

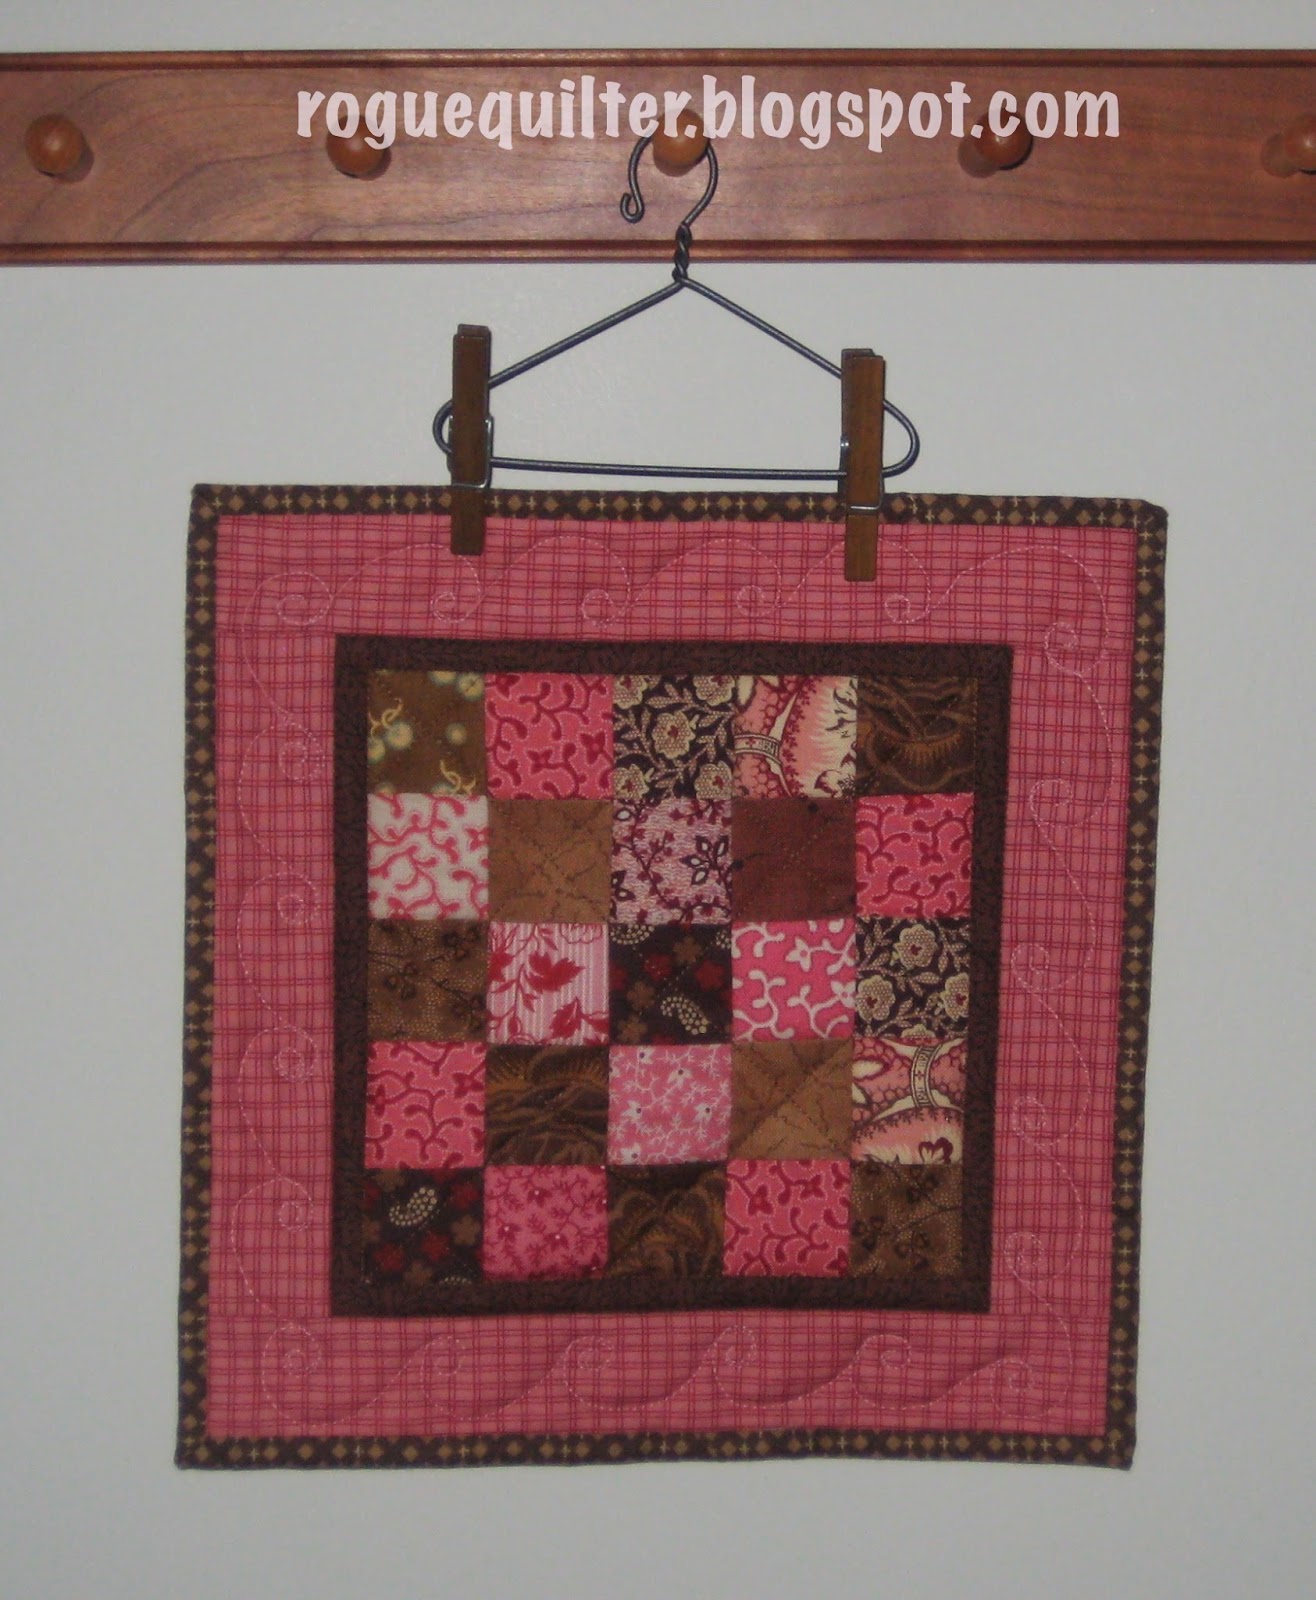
8. Keep your binding small to keep it as close to scale as possible, and don't use the double fold--too much bulk. I cut my binding strips to 1", sew them to the front of my quilt with a hair under a 1/4" seam, and fold it under on the back side and stitch down by hand. It is a very snug fit to get it around to cover the stitching line on the back. I use binding clips on large quilts, but on my minis I pin it down with the slim glass-head pins to keep the binding precisely in place--especially on the corners. This little quilt (the squares are each 1") has the binding sewn on the front and pinned down on the back, ready for hand stitching.


9. One last thing, many miniature quilt makers like to press their seams open to lessen bulk. Before doing so, consider how you want to quilt the pattern. If you want to truly stitch-in-the-ditch, you will not want to press your seams open, or you will just be stitching over your threads--there isn't really a ditch if the seams have been pressed open. If you SITD by stitching just to the side of the seam, it won't be an issue.

If you have any other tips about sewing in miniature, I'd love to have you share them in the comment section.

(ETA--tips below about needle, thread, and stitch length are worth noting. I haven't been one to change needle size, though I should give it a whirl. I know many people do use a smaller than normal needle. I generally use Aurifil 2-ply, 50 wt thread. It is fine and strong and doesn't lay heavily in the seams. I have used the Mettler thread mentioned, too, but I do seem to get more lint with Mettler threads. My stitch length is set at 2 as well. Thanks for sharing your tips, Tina W.)

I've added another page to the tabs at the top. I've had many questions about the way I did my yardstick gallery, so I've made a page showing my method, and linked to Ann Hermes' blog page where the idea was spawned. I don't do mine exactly like hers, so you can see the two methods, if you are interested,  and decide what works for you. Have you a favorite method for hanging small quilts?

DH is camping with scouts tonight, so it is a late night blogging and sewing for me.
Until next time,
Janet O.

Saturday, August 2, 2014

All Squared Away!

Lately, in my sewing room, I kept bumping into a little basket of leftover 1 1/2" squares. I think they were trying to tell me something. So I took the basket and a few small design boards to my sewing machine to piece some simple little one-patch quilts. This is what happened.
Most all of these are from a basket of squares and a few strips from my scrap baskets. Five of them are quilted and the binding is sewn on and pinned to the other side. The sixth one is still a flimsy.

I started with this little piece--just randomly alternating light and dark squares, blurring the lines now and then with some medium values. I am always happy making scrappy quilts. What I struggle to make are two-color quilts. I'm always throwing in another color or two (or more).

So after making this, I sorted the remaining squares into piles, by color. Then I paired off the piles of colors and challenged myself to make some little two-color pieces.
Recently I had seen a red and brown quilt on another blog and it has stayed on my mind ever since. So it was my first two-color experiment.
So far, so good. No extra colors crept in. So I moved on.
Red had been the largest pile, so there were still plenty leftover to pair with the pile of greens.

Blue and gold are a classic combo, to me. Like sunlight glinting on water, it is a soothing pairing.


I really should have dead-headed the little African Violet plant, or chosen one with no dead blooms, before taking this photo, but I didn't even notice until the photo was on the screen.
(Okay, I have a confession to make. To get truer colors in photos I take indoors at night, I take them in a dark room with a flash. I often don't really see what the photo looks like until I upload it.)
I am not a big fan of pink, but I love the classic combo of CW pinks and browns.

This quilt is where I got off track. Not only did I add a third color, but I also deviated from the one-patch format, and I had to leave the scrap baskets to find that lovely Jo Morton gold fabric the four-patch blocks seemed to be asking for.

Since Gidget was warmed up quilting these little pieces, I put her to work on something I should have had quilted long ago.

This is the baby quilt I made from the block swap I did with Maureen last summer. I did a rope pattern in the red border and put a large stipple on the rest of the quilt. It is a baby quilt, after all, and will see lots of wear and tear.


I finally settled on a soft green for the sashing in my Garden Maze setting, after auditioning all suggested options. I think it is a nice variation from the simple sashing and cornerstones.
I can promise you there won't be this much to share next time. I was making up for 3 weeks of not quilting at all!

BTW, the winner of my drawing was Kathy, who blogs at Empty Nest But Full Heart. Congrats, Kathy. 

Until next time, Janet O.