I am so excited to have something new on my design wall! This is something I have been working on off and on for a couple of years. It has a story behind it, but I will save that for another day. I have realized, as I have worked on the ocean waves blocks, that I miscalculated the brown border around the tree of life. I am going to be unpicking that and putting on a new one. There will be more brown, green, blue, and yellow in the next row of blocks beyond the ocean waves that will help tie it all together (hopefully). This quilt is finally up on the wall because this finally isn't.

It seems like this t-shirt quilt was on my design wall forever, but I've only had my design wall for a few weeks, so I guess that can't be true. Anyway, it isn't there any more! And when I say BIG finish, I mean BIG! I couldn't get it back up on the design wall all alone, it is so heavy. So here it is in flimsy stage (though this isn't that flimsy) on the floor. I need to get a back made and get it off to the quilter. It will be nice to work with fabrics I love again, instead of t-shirts! But I am happy with the way it turned out.

Some of you have asked about the perforated paper piecing method used in the Mariner's Compass I have been working on. I looked online and it doesn't seem to be covered anywhere. If you decide to make a Compass, I heartily recommend this book by Judy Mathieson. If you have an earlier book by her, I am told this book improves upon her methods. I just know it is easier than I ever dreamed a Mariner's Compass could be! This method can also be applied to many other patterns that would normally use foundation piecing.
If you are curious about this method, stay tuned, if not--see ya later! To get started you will need to photocopy your pattern. Along with your fabrics and usual sewing supplies, you will need to have freezer paper and a marking pen. My freezer paper roll is probably about 20 years old (no kidding) and it didn't seem to adhere to the fabrics quite as well as that of others in the class with me, but it worked well enough.
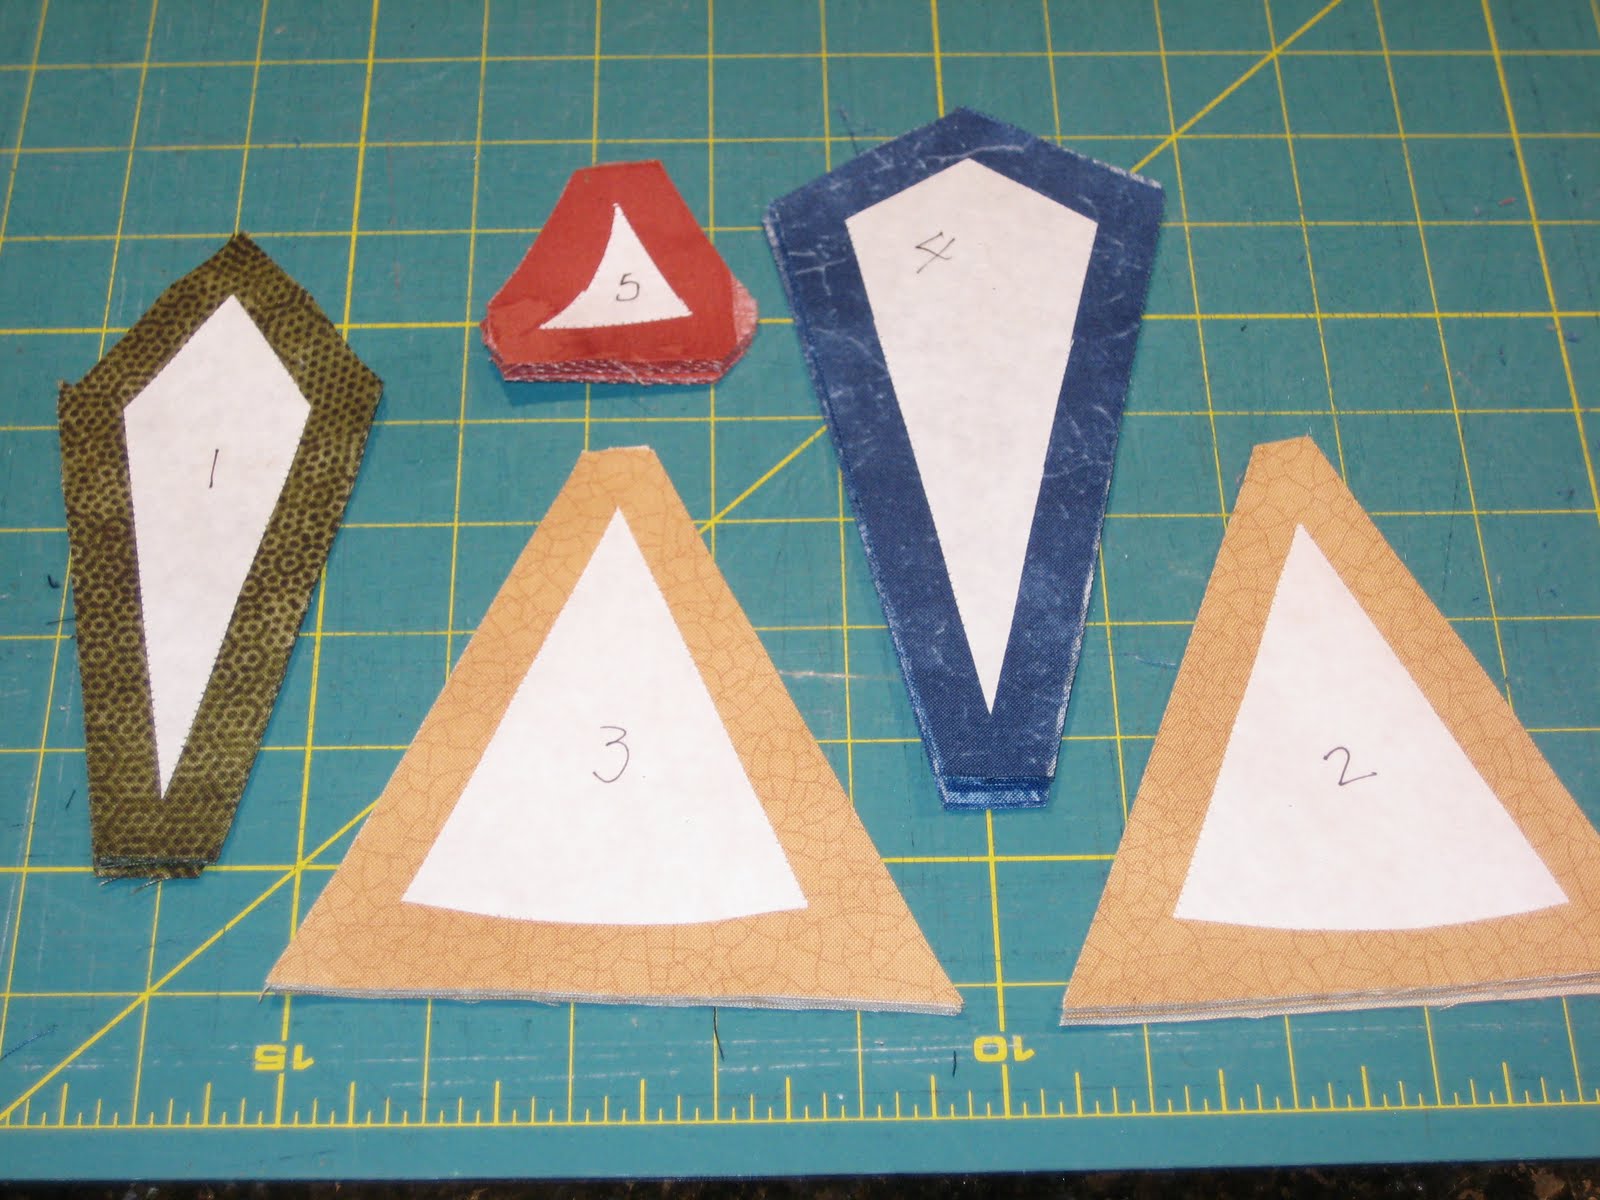
The pattern piece shown in the photo is one eighth of the compass. You will cut 9 rectangles of the freezer paper large enough to cover the pattern--eight will be for the piecing and one will be used for cutting your fabric.
Stack your 9 pieces of freezer paper, shiny side up, and staple your photocopied pattern to them.
Remove the thread from your sewing machine needle and proceed to stitch along the lines of the pattern, leaving perforations along all of the sewing lines.
Check the back of the papers before removing the pattern piece to make sure you got all of the lines sewn.
Remove the pattern and set aside. It can be used again for making another compass. Cut out along the outside perforations of all nine pieces of freezer paper. Number the sections on the dull side of each piece, as they are on the pattern. Cut apart
one of the pieces to use in cutting your fabrics. Leave the other eight intact.
Layer your fabrics (you will need eight of each piece) and press each of the cut apart pattern pieces onto the appropriate fabric.
Cut the fabrics around the pattern pieces, leaving a 1/2 inch margin around the edge of the pattern.
Take a piece of fabric from template #1. Place the wrong side of the fabric against the shiny side of one of the paper patterns, centering it over the area labeled #1. (Can you see the pretzel in my hand? I had the late night nibbles.)
Press the paper onto the fabric.
Fold back the paper along the perforation between sections #1 and #2.
Now take a piece of fabric from template #2. Place the right side of this fabric to the right side of fabric #1, making sure that it is positioned to cover the area of the folded back section #2 and leave room for seam allowances. I find holding it to a light source helps me line it up properly.
Make sure your machine is threaded again! Sew right against the folded perforation.
Trim the seam to 1/4 inch.
Open up the fabrics, fold section #2 back in place and press this section to the corresponding fabric.
Now fold along the perforation between #1 and #3. You will need to fold on up through section #4 to complete this seam. Follow the same procedure as on section #2.
Continue in this same way for sections 4 & 5.
When all sections have been sewn together, trim around the paper, leaving 1/4 inch margins.
This completes 1/8 of the compass. Repeat this process to make 7 more of these.
When all eight sections are complete, you sew them together, just lifting the paper on the edges, so they are not sewn into the seams. See all of the paper sections still in place in the photo below.
The circular flying geese units around the edge are made using the same technique.
Then you have a Mariner's Compass with geese circling and you didn't have to tear away any paper from your seams!
If you have stayed with this, please give me your input. Did it make sense to you? I know it is long, but I am a very visual learner, so I always think other people need as many pictures as I do.
Until next time, from the little mountain valley where it is just starting to feel like summer,
Janet O.


The t-shirt quilt top turned out great! Congratulations on finishing it!
ReplyDeleteAnd that medallion quilt will be fabulous! I love the contrast between the warm colours in the tree of life block and the cool colours in the ocean waves! I look forward to following the progress on this one!
Thanks for the tutorial on perforated paper piecing! I'm saving it to my computer and will give it a go on a day when I feel like fiddling with paper (I have a bit of a paper piecing phobia *lol*)
I've always wanted to do a Mariner's compass. I love your tutorial. Will have to come back to it when I'm ready to give it a better go.
ReplyDeleteI need lots of pictures, too. It makes sense to me - very clever method! Thanks for the tutorial.
ReplyDeleteI know how you feel about the t-shirt quilt. I typically use all cotton batting, but was advised to use a poly batt for t-shrit quilts because they are so heavy. Have you selected a batt yet?
I love the combination of the tree and ocean waves. Sounds like this will be another large quilt!
Thanks for the tutorial! I have heard of this method and wanted to try it. I'm thinking I'll try it out on one of my Moonglow blocks (Jenny Beyer pattern).
ReplyDeleteYour t-shirt quilt is beautiful!!! One of the nicest I've seen. The sashing treatment really sets it apart from the usual.
The compass is beautiful and yes, your directions make sense. I use the method of the freezer paper being folded back where you don't stitch through it when creating your piece. But I do not make my patterns the way you do with the needle piercing and photocopy method. Makes sense and I think I will give it a try.
ReplyDeleteYour directions made perfect sense. Your Mariners Compass is just too beautiful!
ReplyDeleteI really like your T-shirt quilt. It is honestly the best I have ever seen.
I'll refer others here for your detailed instructions.
ReplyDeleteThanks for all the time you put into it!
Beaustiful projects too.
Your directions are excellent! I am a visual learner, too, so the more photos the better I like it. That's a neat way to make templates, and then you can just iron them onto the fabric. What a beautiful block.
ReplyDeleteJanet - a compass has been on my bucket list and you have just reminded me of that. I even think I already have the book...Thanks!
ReplyDeleteI've never tried it that way but you can bet that I will! My dream is to someday make a Mariner's Compass with the ocean waves blocks around it. My mom is a cook on a tugboat that pushes the barges up and down the rivers. Actually she is somewhere on the Mississippi River right now. Anyway...I would love to make one for her.
ReplyDeleteKristie
Love the tree of life quilt it looks like a very interesting pattern. Thanks for the tutorial on the technique you used to make the mariner's compass. I think you used just the right amount of pictures.
ReplyDeleteI really like your instructions for the mariner's compass.I have always found that pattern intimidating, but reading about your method makes it feel do-able! I'll have to give it a try. Also like your tshirt quilt. I made one and felt the same way you did when it was done. I couldn't wait to work with fabrics that I love. Take care, Sally in SC
ReplyDeleteI'm saving your tutorial on my computer when I get to one of Judy's patterns. I have one of her books in my library for my one day project. I love a pretty compass! Now if I only live long enough to sew half of my someday projects.
ReplyDelete