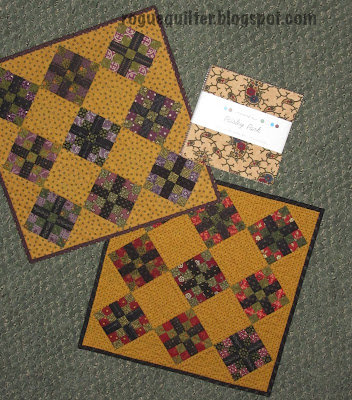
Here is the first one after I got the ubiquitous black binding attached.
I put cross-hatching in the setting triangles, and I did itty-bitty feathered wreaths in the setting squares (that gave me fits--I had to unpick two of them). You can see it all better from the back. And I didn't bind this one in black, either. It looks like it, I know, but it is a dark purple.

You may recall that I made my versions half the size of Lori's original, so that made the wreaths smaller than I have ever tried. Here you see the finished quilts with a 5" charm pack to get a little perspective.
This made the wreaths 2"! I used a stencil--I have not gained enough skill and confidence to free-hand those things (probably never will).
I want to share something with you about the feathers on stencils. It is something I have noticed over the years that I have worked on feathers and I thought I would give a little insight.
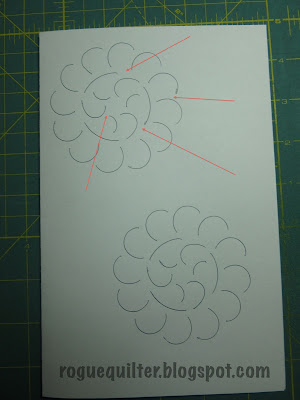
When you trace a stencil from a wreath you often end up with something like this.
You can see the arrows pointing out all of the gaps needed in order to keep the stencil together.
This sample is from a 3 inch feathered wreath--it was a little easier to show you than on the 2 inch wreath, though the pattern is exactly the same.
 I typically fill in the gaps with whatever type of marker I am using on the quilt, for ease of flow as I quilt. For this purpose I have used a red pencil on the paper to fill in the lines. I think the photo here shows what is typically done to fill in gaps. It makes a nice feathered wreath, but something about it has always bothered me.
As I studied free-hand feathers I realized the stencil tended to create a less graceful feather shape. The stencil design below is filled in with lines that create more of the free-hand shaped feather.
Can you see the difference?
Try comparing here.
If you are still scratching your head trying to decide what is different, maybe this will help.
Can you see how the top feathers are shaped like a teardrop and the lower ones have a shape all their own? There is no right or wrong shape and I haven't notified the quilt police to be on the lookout for malformed feathers, I have just found the teardrop shape to please my eye more and look more like the free-hand feathers I was taught to make. You quilt your feathers however you would like and they will look lovely no matter! : )
Enough of that, let's float some foxes! Gidget worked hard and got it all quilted.
Abby's name even found its way into the quilting. You can almost see it here. : )
All of the faces got furry cheeks, swirly eyes, and loops on the nose.
Stippling finished the background of the fox blocks.
The grey diagonals received VERY
A swirly pattern that incorporated hooks and eyelashes as fillers covered the aqua diagonals.
I have a teal fabric for the binding and there is still a week before the birthday, so hopefully I will get it finished, even though I am the world's slowest binder.
The fox pattern is by Elizabeth Hartman, and comes in several sizes. I used Fancy Fox II, making the less gigantic of the two blocks in the pattern. For smaller foxes choose the original Fancy Fox pattern. (These links are for PDF downloads.)
Janet O.


