Showing posts with label Orca Bay. Show all posts

Saturday, May 16, 2020

Maggie's quilt and a blogiversary

Maggie is my youngest granddaughter. She just turned 5 and I haven't made a quilt for her since her two crib quilts. It was time. I gave my daughter the choice of a few finished tops I have on hand and she chose my version of Bonnie Hunter's Orca Bay.  If you are familiar with this pattern you may recognize that I cheated and used stripes and plaids in place of the string pieced blocks. This is the quilt that made my mother exclaim, "I could never get to sleep under that quilt!" 
Here it is with the binding half finished. That's where it stands.
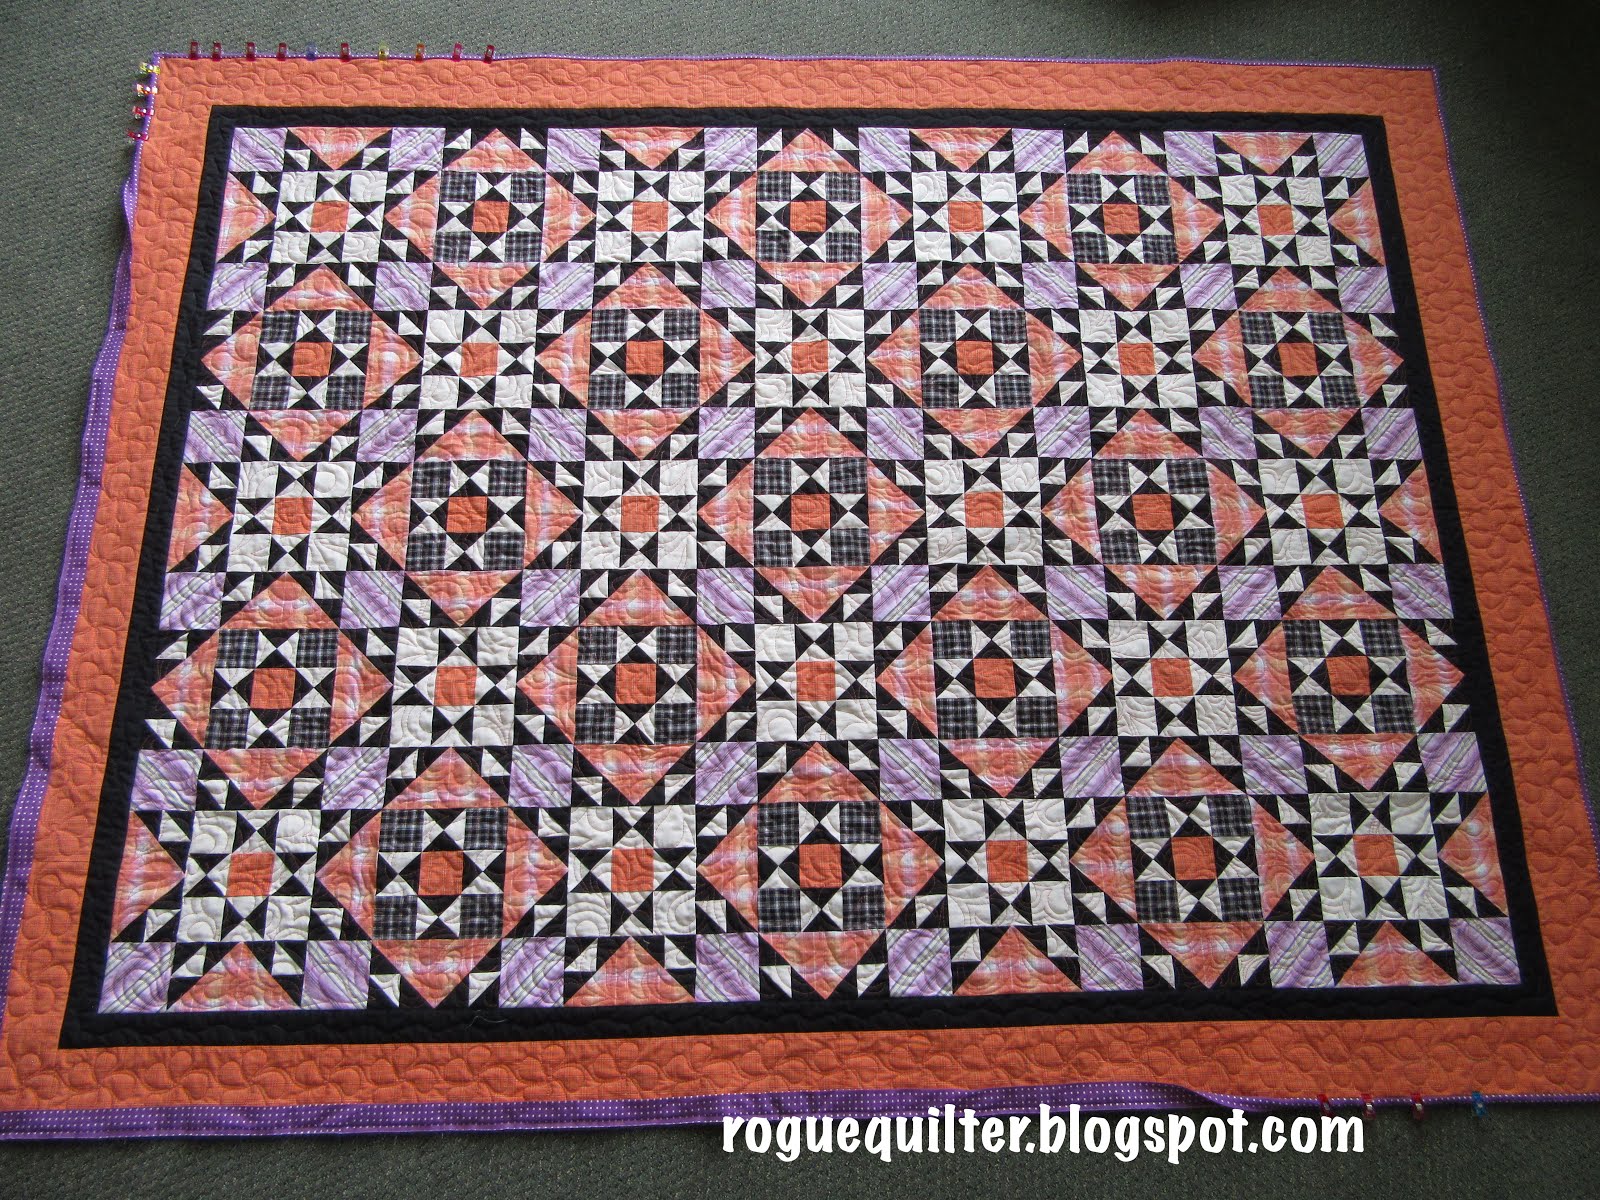
I am the world's slowest binder. I have already spent two very long evenings stitching on this binding. People always tell me I will get faster after doing more. Are they kidding? I bound my first quilt in 4-H about 50 years ago. Believe me, I am not getting faster!

I originally named this Sunset Over the Rockies when I first made it way back when, but since it was made entirely from men's thrift store shirts, I renamed it Sunset Over the Men's Department. That is hardly fitting for a little girl's quilt, so it may get a new name--again. I'm still pondering that.

It has been a very long time since I have finished anything larger than a wall hanging with an all-over design of FMQ. I always worry that I will not be able to keep the size of the design consistent throughout. To choose a design one of my go-to sources is this book of Patsy Thompson designs. It isn't really a book, but I made it into one. She has a slew of wonderful designs for free download on her website here.

Years ago, when I was first getting my feet wet in the free motion quilting sea, I participated in the SewCalGal (now QuiltShopGal) Free Motion Quilt challenge and Patsy Thompson was one of our monthly teachers. I felt like some things (feathers, for one) really clicked for me while following her tutorials, so I looked at what else she had to offer on her website and was excited to find her free designs. As I began downloading the pages, I knew I needed to organize them somehow. I created a cover to make sure she got the credit for everything and I had it printed on cardstock and laminated. Then I placed all of the designs between the covers and had the whole thing spiral bound. It is very convenient and helpful to flip through and find a design I want to try.
My attempts never turn out exactly the way hers do, and that's okay. She plants the seed of the idea with her design and as I try to replicate it a new version appears. On my practice piece I realized I was starting the design too small and it would take forever, use more thread, and make a stiffer quilt, so you can see that I shifted to a larger scale.

And speaking of the thread, I chose a salmony orange from Mettler. I prefer Aurifil for less lint and a finer thread, but they didn't have a color anywhere close.
The Mettler color was only available in the smaller spools. I had one and I bought the last four my quilt shop had. It is only a twin size quilt, so I hoped that would be enough. But it wasn't. I had about half of the last border left to quilt when I was totally out of thread. Knowing I would find no more in town, I decided I would just make do. I reached for a spool of orange Aurifil--so much brighter than what I had been using. I picked up the bobbin that was stored with it, but when I saw it in brighter light it wasn't the same color on the bobbin. It was the original Mettler thread I had been using and it was about half full. WooHoo!! The bobbin doesn't fit on the spool pin of my machine, so I hand wound it onto the spool I had just emptied. As I continued quilting the rest of the border I practically held my breath the whole way. I made it, but just barely.

This was quilted on Gidget, my HQ Sweet Sixteen. (Can you see the panda bear fabric I used for backing?) It is the largest thing I have quilted on it since my shoulder surgery two years ago and I could tell my left shoulder tired much more quickly than my right. I need to build up those quilting muscles. There are many larger quilt tops hiding in the closet. :)
I know I have touted the excellence of the Quilter's Select rulers before, but I have to put in another plug. Before stores closed down, I had purchased this ruler, which is for machine quilting. It is thicker than the rulers for rotary cutting, and it has finger holes. The coating on the back made this stay in place for straight line quilting better than ANY OTHER METHOD I have tried--and I have tried them all, from medical tape to sandpaper dots, and everything in between.  Believe me, this is worth it!
I used a stencil and a water erase marker to mark the design in the outer border. After it was quilted, I sprayed it with water to remove the marks. As I placed the quilt in my lap to start binding, I saw something I have never seen before. Not only had the panda fabric on the back done a little bleeding, but the thread had been bleeding, too. Have you ever had that happen?? When I finish the binding I will wash it with some color catchers and see if that helps, but this took me completely by surprise! At least it doesn't show on the front.

Wow, I really detailed you to death on this post, so if you stayed with me, here is the fun part. Today, May 16th, is the actual 9th anniversary of my blog. I have a little thank you giveaway for my loyal readers and friends.  
There is an autographed copy of Pam Buda's new book--Vintage Treasures, a little bowl filler I made from a leftover block when I made a log cabin doll quilt, a Moda design magnetic closure notepad, and one of my new favorite scented candles. They are made from palm wax, cotton wick, and essential oils. They are great and I want to share them.

Leave a comment if you are interested. If you have  commented before and never received a reply from me (I reply to everyone that has an email attached to their account), PLEASE leave your email address in your comment or I have to choose a new name.
On that note, happy blogiversary to me! :)

Drawing now closed!  

Until next time, 
Janet O.


Wednesday, July 25, 2018

It's all about plaid! Lots and Lots of plaid!

This post seemed to feature a lot of plaid things, so I took that theme and ran with it! And I ran a LONG way!! :)
For my July mini I finished up my little plaid quilt. It ended up being just over 8"x10".
I quilted 1" clamshells through the center and did SITD around the HSTs on the sides. I marked the clamshells with a stencil before quilting them. With my shoulder issues, it has been a long time since I did any FMQ, and there is a lot of wonkiness in those clams!

I haven't been able to narrow down a source for this design, other than Kathie Holland. One blogger suggested it might be Lori Smith. That sounded reasonable, but a search through the patterns on her website did not bring up this design.

In my last post I mentioned that this was the first mini I had made using homespuns. It is possibly the only quilt of any size I have made from homespuns.
I have made many quilts using plaids, but they have always been culled from men's thrift store shirts. Though Civil War repros are my favorite fabrics, plaids come in a close second. I decided to look back and see just what I have made from all of those shirts stashed in my sewing room closet.

I think this table runner was one of my first attempts. It finished at about 24"x14".
 
At Christmas this sits under my German Pyramid nativity.


This is the closest to a finished shot I have of this table runner that was made using many of the same shirts as in the project above. This was a gift for DD#1 a few years ago.
I made it using a Tara Lynn Darr pattern from her Simply Charming book, and I just lengthened it a bit to make it into a runner.


Using some leftover strips from that creation, I stitched up this simple rail fence table topper. It sits beneath the year round miniature Christmas tree in the "Christmas Corner" of my sewing room.          

In keeping with the Christmas colors theme, I made this quilt (still just a flimsy) using Bonnie Hunter's Smokey Mountain Stars free pattern. I call it Rocky Mountain Christmas.
Love this! I keep teasing myself that one of these days I think I will actually get it quilted in time for holiday use. Silly idea.

I have made a couple of other plaid minis. Baby Bow Ties is foundation paper pieced from a pattern found in an issue of the now OOP Miniature Quilts magazine. Each bow tie finishes at 1"! The whole thing finishes at about 8"x10".


This little patriotic piece is designed by Diane Hansen, and was featured in a Better Homes and Gardens publication, Make It Mini, published a few years ago. It finishes at 7 1/2"x6".

It now resides with my friend, Kris, in Oregon.


Another Bonnie Hunter design that I have made in plaids is Orca Bay, or as I like to call it, Sunset Over The Men's Department. Here it is on my design wall with the borders pinned in place. They are now attached, but it is also still a flimsy. Did I mention that my shoulder has given me grief for a few years now and I haven't done much FMQ? (I know--I've mentioned it many times.) :)
Mine is only twin size. That is as far as I could stretch the peach plaid and purple striped shirts. Obviously, my border is not as exciting as Bonnie's, but once I was at that point I was so done with HSTs. One big shirt made that last border.

The most fun I have had with plaids was constructing the Barrister's SAL quilt, hosted by Randy at barristersblock blog. You can find the links to all of her patterns in the tab by the same name under my header photo.
I loved choosing the shirts to work with for each block.
Again, this photo shows it on my design wall with the final border pinned in place. It is now attached, but again, this is still a flimsy. It is more a full size bed quilt. The last border took two shirts.

I have two other Bonnie Hunter designs in the works from plaid shirts. Since Bonnie is the one that inspired me to work with plaid shirts, it seems fitting to me to use them for most of her designs that I make.
As I prepared this post I realized how similar these two quilts are in colors. Maybe I can just combine the blocks from them that I have made so far and call it good. :)
This is Easy Street. Should have been finished long ago. All of the parts are cut out and I thought I had 9 of the blocks assembled. Imagine my surprise when I put them up on the wall and discovered there are 10! What is stopping me from getting this done? I really like this design.
When you step back from it (and get a few more blocks made) the chains stand out more. I love chains!


Last--and least--I have stitched two whole blocks of Midnight Flight, from the class I took from Bonnie last summer. The only color differences between this quilt and the one above is the mustard in the first quilt, and the black in the second.
From experience, I already know how easy it is to misplace pieces in these blocks. Maybe I can just make two more of these blocks, create a center medallion with them for the quilt above, and call it Midnight Flight Over Easy Street. LOL

That is it for plaid quilts, but I will share some plaid kilts with you, if you are still with me.

The Scottish Festival in Payson, UT was July 13-14. We had a great time and DH is already talking of returning.
There were strong men...


and women.


There were dancers ....                                                                     


and lots of pipers!                                                          


There were swordfighters...

...and even a Santa Claus or two were spotted in plaid. I think when this photo was snapped I was trying to convince him I was on the "nice" list. Don't know if it worked.


A highlight of the experience was the Scottish band The Fire. Three very talented musicians play traditional and original music, and they are good!
Listen, if you would like, to about 30 seconds of the "hyper piper", as he says he is called.
You have probably had more than your fill of plaid by now,
Until next time (when there will probably be no plaid),
Janet O.


Thursday, March 13, 2014

UFOs dropping like flies--kind of.


This is Bonnie Hunter's Smoky Mountain Stars free pattern, which I made entirely from men's shirts and named Rocky Mountain Christmas. Last time this was on my wall (years ago) I was struggling with whether or not to use the bonus triangles the stars created to make a sawtooth border.
 I finally decided it was too busy and distracted from the simplicity of the stars, but I put it away without attaching the borders that were already cut. How lame is that? Now it is bordered and we are both happy!

Currently on the design wall is another Bonnie Hunter pattern--her mystery from about 3 years ago--Orca Bay. It only needs the final border pieced and attached.
I made this one entirely from men's shirts, as well. I had planned to name it Sunset over the Rockies (Yes, I love my Rocky Mountains), but ended up going with Sunset over the Men's Department, instead. Bonnie's borders are always piecing masterpieces, but I run out of energy by the time I get to the border--and I like some calm areas for the eyes to rest, so I just used straight borders. If you enlarge the photo you can probably see that there is a small plaid design to the orange border. I had to fussy cut it so that the stripes of the plaid would match when I sew the pieces together (yes, I HAD to do that!!). Good thing it was a very large shirt!

Of course, there is still the small stuff happening. This is the piece I mentioned in my last post that I was going to quilt with an all-over design. It didn't happen. I had every intention, but I just couldn't do it. Those 9-patches were crying out for straight lines criss-crossing through them, and those snowball blocks wanted their own design. So "Herald Angels", a flimsy from 2012, got custom quilting, in spite of my plans.


My pictures usually load straight, but this one wouldn't. You can click on it to see the quilting, and just ignore the thread nests and toe-catchers. I was trying straight line quilting using rulers on Gidget, instead of my walking foot on my Pfaff. It was a new experience--one I will try again, but selectively.

That is it for the UFOs this post. Now for the new stuff.

A few months ago, on Diane's blog I saw the cutest little quilt for a cat lover. She gave the link and I ordered it immediately, thinking I would make it for my Mother's birthday in February. But time got away from me and that didn't happen. I consoled myself that there was Mother's Day in a few months and I could shoot for that. When I started this little thing last week I could not stop.
Cat Nap. Finished at 9 1/2" x 11".
The pattern called for just a little knot for each eye and a knot for the nose. I had to add a little more detail to the face and ears. I finished the binding last night, and I couldn't wait until Mother's Day. I dropped it by my Mom's today. She was so surprised, and really loved it. She has been a quilter for about half a century, and is a cat lover, so it was ideal for her.
It is paper pieced, and I used all scraps from my Mom's quilts to make it, except the cat fur fabric (thanks, Annie). I machine quilted the border, and SITD, but hand quilted the cross-hatching in the background.

Somehow I got talked into doing a trunk show for a local "Small & Miniature Quilts" guild. Do you all have a friend or two to whom you just can't say "No"? My reaction was, "What, me? Who am I to do a show, and I don't keep most of what I make, anyway, so what would I show?"
Somehow my protests didn't work, so now I am scrambling to make some of those miniature quilts that keep dancing in my head. Luckily, the show isn't until May!
"Scrap Baskets". The basket blocks are 2".
This will finish at 9", with a tone-on-tone brown binding.
This little basket quilt is waiting for feathers in the setting triangles. You can faintly see the white line I have drawn to keep my feathers out of the binding zone. I have done SITD around the baskets and blocks. I am trying to decide whether or not to quilt on the wavy line through the sashing with a matching thread.

Another Rocky Mountain photo for you. On my morning walk a few days ago the clouds were dark and the mountains were white. The wind was whipping at the peaks and you could see the snow whirling in the air against the dark backdrop. Enlarge the photo for a better look.
I know we have had enough of winter, but I love nature cloaked in white.
Until next time,
Janet O.


Saturday, November 24, 2012

Belated Birthday Giveaway

In my last post (over a week ago) I had promised a "little giveaway" on my birthday (which was yesterday). I had planned on just staying home and sewing that day. I do not usually venture out on Black Friday, but DD#2 invited me to meet her at a local craft fair and it sounded like fun--haven't been to one in years. Afterward DH and I went to dinner (though we had gone last Friday since I didn't plan to go out on BF). On top of that, my two sons came over in the evening unexpectedly and brought a friend so we could play some games. What I'm trying to say is that I didn't just sit around sewing all day, so I didn't have time to post my giveaway, but I had a wonderful birthday. When I did get a few minutes to sew I treated myself to a feeling of satisfaction by finally sewing together the center section of my feathered star quilt. The star has been partially assembled and occupying a corner of my design wall since I took the class back in February. It feels so good to get it sewn together. Now I need to play with the borders. Not sure if this is the final choice, but I like it best of what I have tried so far. Once I get the borders and "on point", fussy-cut 4-patches sewn on I will decide if I want to add a final border or two and call it good, or if I should attempt to expand the pattern to a full bed quilt. We'll see.
So here is my "little" birthday giveaway--I meant that "little" literally. There is a Moda Mini Charm Pack, containing 42 2.5" squares of Harvest Moon fabric by Kansas Troubles. Then there is the Primitive Gatherings Tiny Tumblers pattern, which includes the tiny tumbler acrylic template. That is the size I used on the Tumbling Glory flag (see tutorial tab at the top). And finally I have included one of my Tuffet pincushions. The one shown is made in CW repro fabrics, but I can make a brighter one if that is your fabric preference. There may also be a couple of bars of my herbal soap thrown in (not pictured). This is just a "little" thank you to  my readers and friends in blogland who make life more interesting. If you would like to be included please leave a comment.

And speaking of friends in blogland, my birthday has been made a little brighter by some fun surprises that arrived in the mail. Mary sent this fun little bundle. Mary was the first blogger I actually met when she came to Utah a year ago. We met up for dinner and then attended a Jennifer Chiaverini book signing. I recently "won" a couple of batik fat quarters on her blog (it was kind of a set-up job) and she sent along some other goodies as well. There was actually one more candy bar than is shown, but I had no resistance when I opened the package. : ) Thank you so much, Mary!

The other little squishy came from my newest old friend. We live less than 7 miles apart in northern Utah, but were introduced through another blogger in Alabama. (Thanks, Denise!) Kris and I met Monday at her home and got chatting about life and admiring fabrics and talking sewing machines. We probably wouldn't have quit after three hours if it hadn't been for a previous commitment Kris had.  I am so happy to know her. We will definitely be getting together again. This arrived in my mail Wednesday from Kris--a total surprise. She has an ebay store (The Quilting Garden) and a blog (Lavender Quilts), so maybe you already know her. Thanks for the lovely surprise, Kris!


This little quilt finally went in the mail today--off to Randy in California. I know it is going to a good home!
Another feeling of accomplishment (okay, so it takes less for me to feel like I have accomplished something than it probably does for most of you)--I have all of the "units" made for Orca Bay, one year after Bonnie started posting the clues. This is as big as I could make it with the shirts I had. You can see that it is not all sewn together (about 1/2 of it is). Now I need to decide how I want to border it. I probably won't be doing Bonnie's border. Don't think I have the patience for it at this point and I think mine looks even busier than the original, with my stripes and plaids. I want something a little calmer around the edges. I actually found a great shirt that is black with purple stripes and I'm wondering if I can use it somehow.
 And finally, when my two sons came over this evening they brought this bouquet. I love the bright mix of colors. I always gravitate to multi-colored flowers and multi-colored bouquets.
 Now, notice the crocheted doily on which the vase is sitting. I bought that at the craft fair I went to with my daughter. A sweet elderly woman had crocheted these and snowflake tree ornaments, butterfly fridge magnets and a bunch of other things. They are all well done--this doily is gorgeous. She had it priced at $25!! Her snowflake ornaments were $1.25 each. The butterfly fridge magnets were often just given away to children who came by. My daughter and I told her she should charge more. Her husband told us that their daughter told them the same thing. We bought a bunch of the snowflakes, and then I got the doily. It is good sized--about 15" across. I couldn't take it at that price with a clear conscience. I gave her $40 and told her if I could afford more I would pay it because it was worth more.

This is a very long, wordy post. Sorry. I have been trying to make them shorter, but I guess I will let this one slide. Remember to leave a comment if you are interested in the belated b'day giveaway. I will let the RNG choose a winner Tuesday night and post the winner Wednesday.
Until next time,
Janet O.

Sunday, November 4, 2012

Just a bunch of stuff.

Mountain Trail is all quilted and bound!

You can see the quilting pattern better from the back.
I'm going to link this up with Lori at Humble Quilts. I had just checked her blog to make sure I wasn't too late to link and I was surprised there weren't more links. I have seen so many of these around blogland. If you have made one and haven't linked yet, please join in. It is fun to see the unique qualities of each quilt, working from the same pattern.

I decided to get my "Random Roses in Jamestown" block done early this month. One more block to go and then I will make some kind of setting squares. I am thinking chain blocks instead of the log cabin blocks in the pattern. I love chains for tying sampler blocks together. I am so proud of myself for keeping up with this, since I am doing it on my own and there is no group, or link to keep me motivated and on track.

I also got another mini quilt finished. When Cheri posted her "labor of love" directions on Labor Day I made two and gave one to each daughter. But I just kept making 4-patches as leader/enders and finally decided I'd better stop and make something out of them. So I made another, larger "labor of love". As is my recent trend, I made the setting HSTs out of rather similar value fabrics--not much contrast there. The 4-patches save it from being too drab. I also bound it with something rather nondescript. I was determined to make this entirely from the scrap basket, and nothing else worked for me any better than this did.

I continue to plug along on Orca Bay (aka SOTMD). I have 32 more of those rectangle unit thingies to make and then I can stitch it all together and figure out how I want to border it. It will only be about a twin size. That is as far as I could stretch the peach and purple shirts. Even after a year, I still love the movement the string blocks (faux, in my case) give this quilt.

 Next up in the quilting cue are these two minis. Both are gifts and the recipients know who they are. I started marking the basket quilt this evening.
My main project for November will be to piece the quilts for my grandsons for Christmas. I have all of the fabric, but have barely begun to cut and stitch. Speaking of grandkids, some have asked to see the costumes I made for two of them for Halloween. 
Abby was a black cat. I made her skirt, tail, and faux fur collar and ankle and wrist cuffs. The ears were purchased. Can you hear her meow?

Ben was The Cat in the Hat. I made his hat and tail, and stitched a white tummy to his shirt. He was thrilled to be "Go-go", as he calls him, because of something on the PBS Kids Cat in the Hat show.
And lest one of the other two grandchildren feel left out, here they are. Matt's Ninja costume was purchased (and can you tell he took his role seriously?) and Josh's Mr. F. costume came mainly from the thrift store, but my clever daughter created his headgear.

That's enough for now. I'm going to go reset clocks and get ready for bed.
Until next time,
Janet O.