Showing posts with label tree of life. Show all posts

Friday, August 26, 2011

The Most Nagging UFO

Did you see the Ask Bonnie! post yesterday where, among other things, Bonnie turned the tables and asked the question, "What is the one big UFO that you would like to work on?"  
Well, this is mine.

The book doesn't come with the
templates (there are pages of
instructions), but I think it is
worth the extra cost.


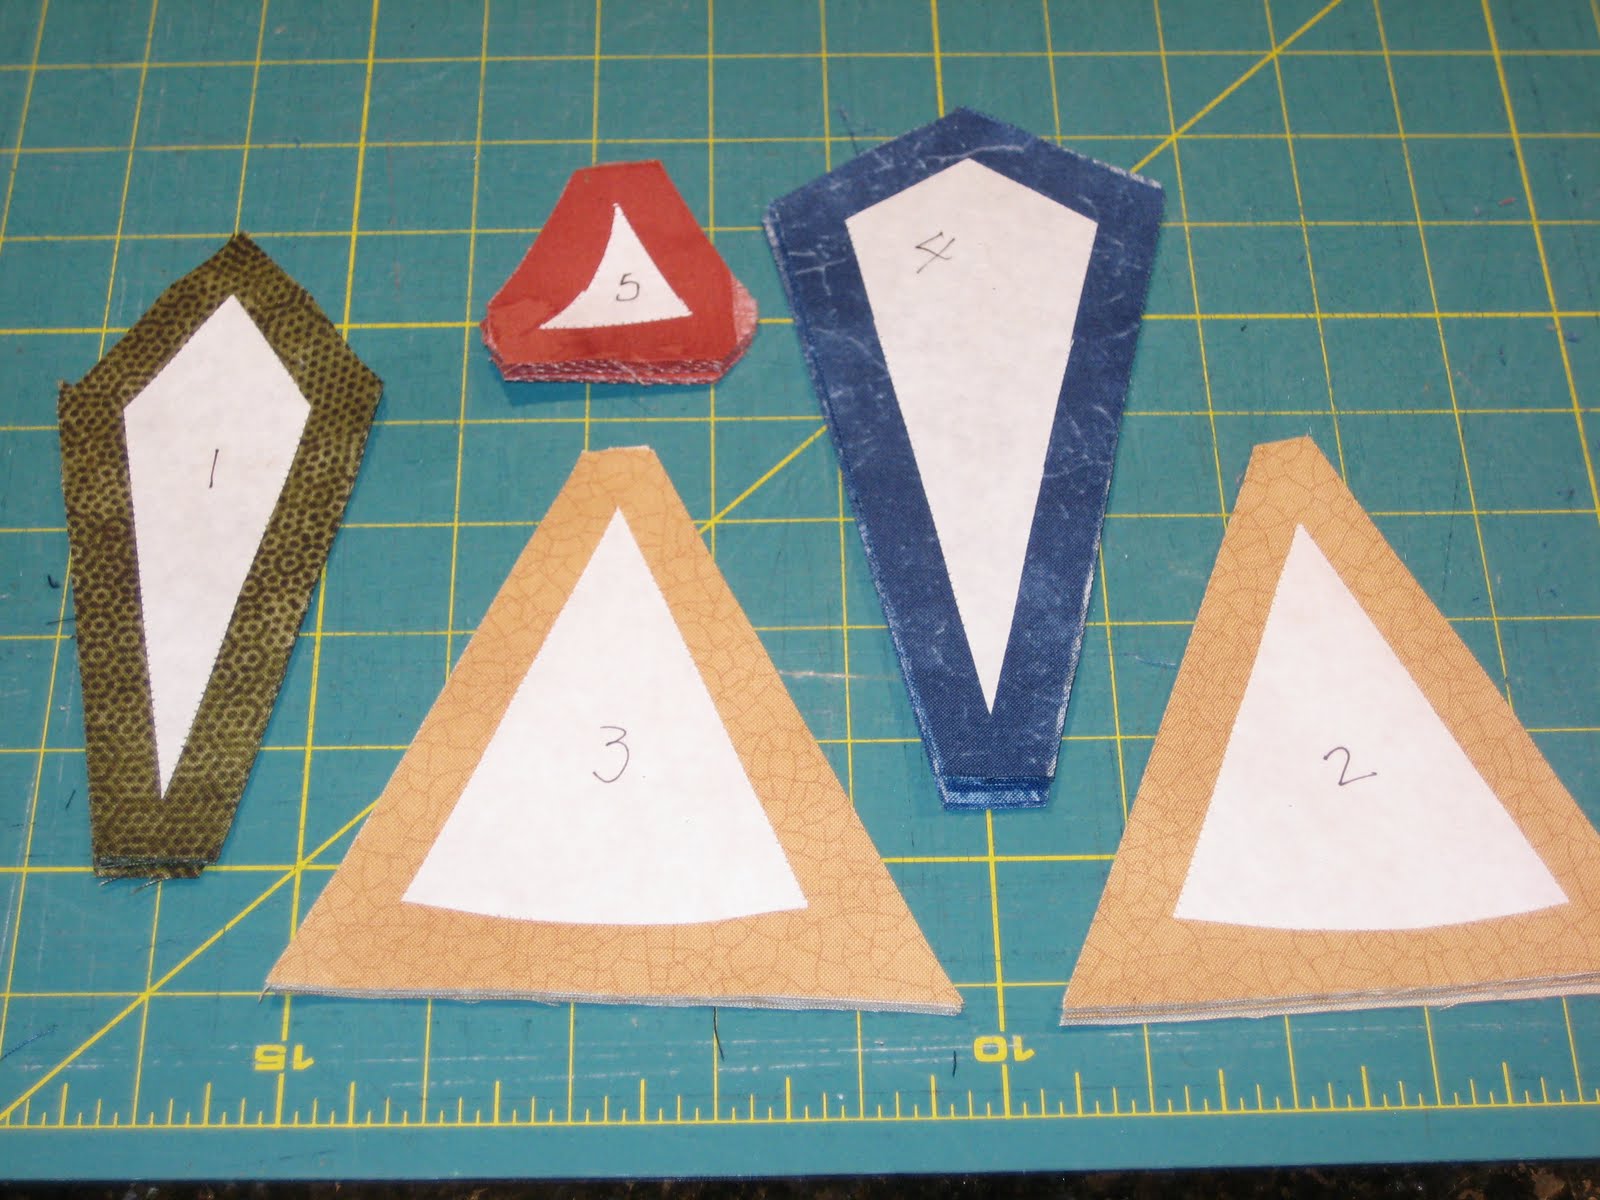
Most of the "football" shapes made by the two arcs and little narrow slivers are sewn together, but the big center pieces are unattached. There are two more rows to go, and I have all of the pieces cut and the arcs all sewn. I've never had it out since I got my design wall earlier this summer, so this is the first time I have put it up here. I learned something in the process. My background print is directional--I had never noticed before. I will have to be careful when I sew it all together. 
 
Templates come in a variety
of sizes--see package top.
 Double wedding ring has been on   my quilt bucket list since before I knew what a bucket list was. My husband's aunt had made a few and I was often suggesting that she teach a class in our community--she was already doing a BOM in her home. When she decided to do it she suggested we just come with the fabrics to make a table topper and learn the technique. Then we could apply what we had learned to make a larger quilt later. (I followed that suggestion, though many chose to bring fabric for a whole quilt.) She has made the Double Wedding Ring quilt using a variety of techniques and her favorite is the John Flynn template method, so that is what we used. I went through my stash and chose fabrics that would match my living room so I could use the table topper on an end table there. I only had to buy one fat quarter to complete my color palette! I was pleased.
There were about 10 of us in her home that day learning this method to make the rings. I admit, it was pretty slick, but I think that day I also realized how slow I am. The BOM I had been attending in her home was mostly frequented by relatively new quilters. I was often last to finish, but only because I took so long to decide which fabrics to use, not because of my sewing speed. When this day was over I know there was at least one woman who had completed a full-size quilt top before going home. (Eleanor Burns didn't lie, you can make a quilt in a day!) I still hadn't finished my table topper. I sat among those women thinking some of their machines sounded more like race cars revving up, than sewing machines. 
This was a few years ago. So why haven't I finished it by now?
I discovered it was going to be too big for the intended table, so I decided to make it bigger and drape it across the back of the sofa. After all, I had chosen colors specifically to match the living room. But did I have enough of the fabrics? I unearthed what was left of them and it looked like I was good to go, except for the fat quarter I had purchased. Though I had just purchased it the week before, the LQS was out of it and wouldn't be getting more in. They did give me the name of the fabric line and designer. I found it online and got it ordered. 
Upon its arrival I got everything cut and started sewing. When I had decided to go bigger I had also chosen to use a variety of background fabrics in the ecru/cream range. For one thing, I like scrappy, and for another, I didn't have enough of a matching background to do the whole thing and was too cheap to buy more. After getting a few "footballs" made from the arcs and background fabrics, I laid them out with the center background pieces. I didn't like it. Discouraged, I put it away. Months later, with renewed interest, I unpicked the few background pieces I had already sewn to the arcs. I broke down and bought a new background fabric. I laid it out in a sunny spot and placed the sewn arcs upon it. I didn't like it. Packed it all away again.
It took two more tries before I found a match that passed the "sunny spot" test. 
By that time I had lost my steam on the whole thing and it had sunk to the bottom of the list. It just never seems to have risen to the top again. You know how that goes. You need this quilt finished for the new baby, that one for a graduation gift, and another one for Christmas giving. But when do the ones you want to make just to keep become your top priority? So far I don't have an answer for that.


If you are still with me, you are amazingly patient, but I beg your indulgence a little longer because I want your opinion. Unless this is your first visit here, you are no doubt familiar with the Tree of Life quilt I am making my youngest son. It is a memory quilt representing his two years as a missionary in Brazil. I am using the colors of the Brazilian flag, combined with more earthy tones, and each block has significance to his experiences there. As I have said before, it is not an attempt to win any design awards. But I am stumped as to the outer border(s). I don't like to make bed quilts square, so in an attempt to avoid that, I only put the "cobblestone" blocks around the sides and bottom. They are not sewn on yet, but I'm pretty sure they will stay this way. I had to do some partial blocks as filler, since the Ocean Waves are 16" blocks and the Cobblestones are 12" blocks. I wanted to finish with a few inch wide border around the whole quilt. I tried a brown, but thought it wasn't a good finish.
I know many of you have commented that when you see something on the design wall it is a totally different effect than when you see it in a photo. Not until I saw this photo did I realize how much the Ocean Waves blocks stand out from the dullness of the other colors. 
Anyway, my next attempt was to add a narrow blue border between the Cobblestones and the outer brown strip.
I liked it better. But still, when I saw it in the photo I wasn't sure. Next I replaced the inner blue strip with a green.
Hmmm, not so sure about that one. Now, my boldest move was to put the yellow in its place.
Better than I expected. Maybe this is what it needs to bring some of the brightness of the center out to the duller edge. Do I need to change that dark blue middle border to a green for a less abrupt transition? What would you do? (Starting over may be what you would do, but it is not an option for me.)
Well, we are in the midst of a thunderstorm and the power has already gone out once during this process. That was probably a hint that I should have quit a long time ago. But this storm is nothing compared to what some of you are facing. 
Prayers go out to those in the path of Irene. Stay safe! 
Until next time, from the little mountain valley where the sagebrush grows,
Janet O.
p.s. The soap is cured, packaged and sent. You winners should be seeing it soon!

Thursday, August 4, 2011

Before, During, and After

If you've been with me through the past month or so, you have seen the Tree of Life quilt. You may recall that I was not happy with the border around the center medallion.


It also didn't totally fill the gap between the Tree block and the Ocean Waves blocks. So it was dismissed.


I tried a few other things, among them, these leftover HSTs. It didn't cut it, but it stimulated some suggestions from some of you.
 I couldn't find a striped fabric that matched. I tried the solid dark blue and it seemed too overpowering, but I liked blue there. So I went with two shades of blue.
Initially I put in dark blue cornerstones, but then I pulled out a few of those leftover HSTs and thought it might work. What do you think? The Ocean Waves blocks aren't stitched on yet, so if it still needs changing, now is the time!
At least the Ocean Waves blocks are finished--Yay!! There is another round of blocks that I haven't started yet. This block comes from a Fons & Porter bonus pattern, "Celtic Cobblestones." 
I've mentioned that this quilt is a commemorative quilt for my youngest son's two years as a missionary in Brazil. He spent most of those two years traversing cobblestone streets. So I am taking the cobblestone block from the Fons & Porter pattern. It isn't sized to match my Ocean Waves blocks, so I'm not sure yet if I will sash them or adapt them or resize them, but somehow I am going to get those cobblestones on this quilt! Maybe I need another blue border between the Ocean Waves and Cobblestone blocks. I'm just thinking out loud here.
I picked up these batiks and textures today to make these blocks. I wanted to imply the look of stones without actually going the route of the stony print fabrics. And this will pull colors from the center of the quilt through the "waves"--I hope. Oh, when will I quit using the design-as-you-go technique?
Just in case there are thoughts running through your head like, "This isn't very pretty," or "This needs more color," remember that this is for a 22-year-old young man--his interest in pretty doesn't extend to quilts.
Until next time, from the little mountain valley where we are in the midst of a thunderstorm and the power has already gone out on me once as I tried to post this,

Janet O.

Sunday, July 24, 2011

Giveaway! (Delayed & Instant Gratification)

This week I hit 75 followers and it is time to have fun (well, I guess we have been having fun--we are just going to have more)! I've made some good friends among you and I appreciate the time you take to visit and comment. I know that many of you first found my blog when I sent some handcrafted soap as a "thank-you" to Bonnie Hunter and she then showed it and posted a link to my blog. I mentioned then that I would give some away when I had enough followers. I had planned on doing it at 50, but I didn't get on it fast enough when that number came up. Then before I knew it there were 75 and that seemed like a good number to celebrate.

A giveaway of the Eye Fooler pattern, Tri/Recs rulers
 and some handcrafted herbal soap.

The delayed gratification will be the soap. I will email the winner a list of the scent options and make the soap fresh for them. Since it takes 3-4 weeks for soap to cure, I will send it on when it is ready to use.
The instant gratification part of the giveaway is the Eye Fooler pattern. When I posted about this quilt before it generated so much interest, I decided that pattern would make a good giveaway. And since you need the Tri/Recs rulers to make it, I've thrown those in as well (if you already have the rulers you can gift them to someone else).
There you have it!

Here is what you need to do, just be sure you are a follower and leave a comment on this post before midnight (12:00 a.m.) MST on Tuesday, July 26. On Wednesday evening I will randomly draw the winner and post the results! I will even choose a "runner-up" to receive some soap.

Just to ease the minds of any who may have less than fond memories of great-grandma's not-real-pleasant-smelling homemade soap, this soap is made with pure vegetable oils (coconut, olive and cocoa butter). There are no animal fats to smell rancid, and the essential oils make it very enticing. The colorants are all herbs and spices--no artificial colors. I started making this stuff because I have sensitive skin. After trying some my BIL made 15 years ago, it made such a difference to my skin, I jumped on board and have been making it ever since.

While we're on the subject of Eye Fooler, in spite of my forsaking this quilt for another, I have made a good-sized dent in the Eye Fooler, strictly as a leader/ender. All of the HST are finished, as are the 4-patch blocks. I'm over halfway through the Tri/Recs units and then I have an excessive amount of flying geese units to make. They aren't my favorites, so I have been avoiding them. I should have just got them over with first. It is sitting on the sidelines now, waiting for me to finish Floribunda.

Progress on my Tree of Life has been slow.
This is my second Tree of Life quilt. I finished up the first one a few years ago.

I hand quilted this one--took me about 10 months to get it finished!
These are memory quilts for my sons who have served as missionaries in South America. I try to make the blocks represent something to do with the names of the areas in which they served or the experiences they had. It was easy to find blocks that were connected to names and places in California, where my oldest daughter served, but when my first son went to Argentina things got much more complicated. Even in Barbara Brackman's "Encyclopedia of Pieced Quilt Patterns" (which I poured over for hours) there are no designs related to South America that I could see. I ended up using the tree of life pattern from "Biblical Blocks" by Rosemary Makhan, along with another religious themed block and a simple "sun" block (if I'd known how to make a Mariner's Compass when I did this, I would have produced a better looking sun) to represent the sun on the Argentinian flag. Put "Spanish Squares" blocks in the corners, for the language he spoke, and called it good!
The next son went to Brazil, and that is the one I am currently stumped on. I need to stop this frustrating habit of design-as-you-go quilting. It would save me a lot of grief.

So again, I thank you for following along. Don't forget to leave your comment by midnight Tuesday. Good Luck! I'm already excited for whoever wins!

Until next time, from the little mountain valley where the sagebrush grows,
Janet O.


Monday, July 11, 2011

How long would your stash last?


Main stash.
The stash can be a quilter's deepest, darkest secret. A couple of responders to my last post indicated that if they never bought fabric again, they wouldn't run out before they died. Whether it was said tongue-in-cheek or not, it got me thinking. My Mom is 81 and still quilting. If I follow her lead, I have almost 30 years yet to go. I really don't think my stash would make it that long.
Neutrals, a
few backings,
and some craft
(not quilt)
fabrics.
How about you? If you kept quilting at your current rate, never bought another piece of fabric, and lived an average lifespan, would you run out?
10 of the large bins and 6 small hold collections, scraps being
cut up, projects that are currently on hiatus, etc.
Above and below you see what I have--modest by many standards, and not very organized.                                                                                                             
These drawers hold my holiday fabrics and a
few current projects.
Scraps sorted by color. I am just starting to get things cut to
use in the "scrap savers system."
How does it stack up to your stash? Do you have twice as much, three times... ten times? Or can you not admit in public?

My "scrap bag" 9-patches are in the flimsy stage now...
... and the irregular 9-patches are shrinking into a very small quilt top. I have to cut them down to 3" unfinished to accommodate the smallest of them, and that means that the largest of them are going to have a center that is much larger than the corner blocks. I place a section of them onto a design board,    
I take the board to my sewing table where I square up the 9-patches and sew it all up.  


Then I place that section back on the design wall and load a board again. See how much it shrinks?
I finally got the brown border off of the tree of life. I'm not sure what kind of a border to use (I have to use something to make the center fit with the Ocean Waves blocks), so I am playing around with possibilities. The HST below are one of many options, but I don't think it will be my final choice. Any suggestions?                                                                                                                                        
Never found the matching corner fabric. I found something similar, but now I need to make the other four blocks and see if I am happy with that look--8 of the blocks have large triangles in one fabric and the last four are in a different fabric. I just am not sure if this quilt has enough of a "scrappy" look to get away with that. We'll see.

I, for one, am thoroughly enjoying the photos on other blogs of the Sisters, Oregon quilt show. Thanks to all who have shared the joy!!

Until next time, from the little mountain valley where the sagebrush grows,
Janet O.

Tuesday, June 21, 2011

Perforated Paper Piecing & a BIG Finish

I am so excited to have something new on my design wall! This is something I have been working on off and on for a couple of years. It has a story behind it, but I will save that for another day. I have realized, as I have worked on the ocean waves blocks, that I miscalculated the brown border around the tree of life. I am going to be unpicking that and putting on a new one. There will be more brown, green, blue, and yellow in the next row of blocks beyond the ocean waves that will help tie it all together (hopefully). This quilt is finally up on the wall because this finally isn't.

It seems like this t-shirt quilt was on my design wall forever, but I've only had my design wall for a few weeks, so I guess that can't be true. Anyway, it isn't there any more! And when I say BIG finish, I mean BIG! I couldn't get it back up on the design wall all alone, it is so heavy. So here it is in flimsy stage (though this isn't that flimsy) on the floor. I need to get a back made and get it off to the quilter. It will be nice to work with fabrics I love again, instead of t-shirts! But I am happy with the way it turned out.


Some of you have asked about the perforated paper piecing method used in the Mariner's Compass I have been working on.  I looked online and it doesn't seem to be covered anywhere. If you decide to make a Compass, I heartily recommend this book by Judy Mathieson. If you have an earlier book by her, I am told this book improves upon her methods. I just know it is easier than I ever dreamed a Mariner's Compass could be! This method can also be applied to many other patterns that would normally use foundation piecing.

If you are curious about this method, stay tuned, if not--see ya later! To get started you will need to photocopy your pattern. Along with your fabrics and usual sewing supplies, you will need to have freezer paper and a marking pen. My freezer paper roll is probably about 20 years old (no kidding) and it didn't seem to adhere to the fabrics quite as well as that of others in the class with me, but it worked well enough.


  The pattern piece shown in the photo is one eighth of the compass. You will cut 9 rectangles of the freezer paper large enough to cover the pattern--eight will be for the piecing and one will be used for cutting your fabric.

Stack your 9 pieces of freezer paper, shiny side up, and staple your photocopied pattern to them.
Remove the thread from your sewing machine needle and proceed to stitch along the lines of the pattern, leaving perforations along all of the sewing lines.
Check the back of the papers before removing the pattern piece to make sure you got all of the lines sewn.
Remove the pattern and set aside. It can be used again for making another compass. Cut out along the outside perforations of all nine pieces of freezer paper. Number the sections on the dull side of each piece, as they are on the pattern. Cut apart one of the pieces to use in cutting your fabrics. Leave the other eight intact.
Layer your fabrics (you will need eight of each piece) and press each of the cut apart pattern pieces onto the appropriate fabric.
Cut the fabrics around the pattern pieces, leaving a 1/2 inch margin around the edge of the pattern.
Take a piece of fabric from template #1. Place the wrong side of the fabric against the shiny side of one of the paper patterns, centering it over the area labeled #1. (Can you see the pretzel in my hand? I had the late night nibbles.)
Press the paper onto the fabric.
Fold back the paper along the perforation between sections #1 and #2.
Now take a piece of fabric from template #2. Place the right side of this fabric to the right side of fabric #1, making sure that it is positioned to cover the area of the folded back section #2 and leave room for seam allowances. I find holding it to a light source helps me line it up properly.
Make sure your machine is threaded again! Sew right against the folded perforation.
Trim the seam to 1/4 inch.
Open up the fabrics, fold section #2 back in place and press this section to the corresponding fabric.
Now fold along the perforation between #1 and #3. You will need to fold on up through section #4 to complete this seam. Follow the same procedure as on section #2.
Continue in this same way for sections 4 & 5.
When all sections have been sewn together, trim around the paper, leaving 1/4 inch margins.
This completes 1/8 of the compass. Repeat this process to make 7 more of these.
When all eight sections are complete, you sew them together, just lifting the paper on the edges, so they are not sewn into the seams. See all of the paper sections still in place in the photo below.
The circular flying geese units around the edge are made using the same technique.
Then you have a Mariner's Compass with geese circling and you didn't have to tear away any paper from your seams!
If you have stayed with this, please give me your input. Did it make sense to you? I know it is long, but I am a very visual learner, so I always think other people need as many pictures as I do.

Until next time, from the little mountain valley where it is just starting to feel like summer,
Janet O.