Showing posts with label Mariner's Compass. Show all posts

Friday, June 24, 2011

Odds and Ends, and an Oddity at the End

Do you make holiday table runners for the different occasions through the year? I have only made 4 table runners to use either on the dining table or the hutch. Problem is I don't have them for all the right occasions. I've made two for fall--one with leaves and the other with pumpkins--and two for spring, though one of those is still in flimsy stage. I have collected several table runner patterns I would like to make and every time Christmas or the Fourth of July rolls around I promise myself I will make something for the occasion. I even spent time this morning hunting for a pattern I know I have and want to make, but couldn't find it anywhere. I had pulled out scraps and fat quarters of my red/white/blue fabric and I didn't want to put it all away again. I needed to forge ahead, so I settled on an Ohio Star pattern, but I wanted more activity in the block. I put a 9-patch in the middle and away I went.
I like how the blocks turned out, but I couldn't decide what kind of setting to use.


I think the one with the blocks on point is getting my vote (though I might try blue setting triangles--what do you think?), and since I'm making it, my vote wins!
By the way, I know I have mentioned design boards before, but I want to say it again. These are great tools to use when making blocks with lots of pieces. I keep them by me as I cut and arrange the pieces on the board. Then I can stack the boards on top of each other and carry them to my machine. The pieces stay in place until I move them and I have a pile of blocks to work on without having to keep getting up to get more pieces and figure out how to put them together. Once the blocks are made they go on the design wall.
All of the loose pieces for the block arranged on the design board.
You can carry it from cutting table to ironing board to sewing
machine and everything stays in place!

Each of the elements within the 9 squares have been sewn.
Finished block.

The boards are so simple to make. Get foam core board at the framing department of a craft or hobby store. They will usually cut it for you with no charge. 15" squares have worked well for me. They hold up to a 12" block and are still a manageable size. Use adhesive spray on one side of the foam core squares and attach pieces of cotton batting that have been cut to fit. That's it! I have fifteen of them and sometimes I wish I had more.


The other night when I did the tutorial on the perforated paper method of piecing I cut all of the parts for another Mariner's Compass, just for demonstration purposes. I didn't think too much about it, I just grabbed some fabric from my "supply shelves" and went to work. The next evening when I was going to sew, the piles of cut fabrics were still sitting out. I was going to put all of it away, but was curious to see how well it would turn out. That is what I ended up sewing. I got it all finished except the center circle applique. When I took the class on this technique our instructor said she thought it looked good to have "movement" in that center circle. I liked what a batik did in the first one I made, so I went to my batik drawer again. I really like what I found to match--you might have to enlarge the picture all the way to really see it. I think I may finish this one before I complete my first one.

Okay, now for the odd. Have you ever seen a freshly sheared alpaca--for that matter, have you ever seen an alpaca? These guys belong to my brother-in-law and they are currently in the pasture that I can see from my kitchen window. The first glance I got after they were sheared made me laugh.
A face only a mother could love?
Their long skinny necks seem disproportionate to their bodies. DH and I agree that they look like some type of alien creature.  Anyway, when I see them out my kitchen window now they bring a smile to my face.
I had to make some pretty silly noises to get
 them all to look at me together.
So, until next time, from the little mountain valley where we actually were over 80 degrees today! (As we say around here, spring came just in time for summer.)

Janet O.

Tuesday, June 21, 2011

Perforated Paper Piecing & a BIG Finish

I am so excited to have something new on my design wall! This is something I have been working on off and on for a couple of years. It has a story behind it, but I will save that for another day. I have realized, as I have worked on the ocean waves blocks, that I miscalculated the brown border around the tree of life. I am going to be unpicking that and putting on a new one. There will be more brown, green, blue, and yellow in the next row of blocks beyond the ocean waves that will help tie it all together (hopefully). This quilt is finally up on the wall because this finally isn't.

It seems like this t-shirt quilt was on my design wall forever, but I've only had my design wall for a few weeks, so I guess that can't be true. Anyway, it isn't there any more! And when I say BIG finish, I mean BIG! I couldn't get it back up on the design wall all alone, it is so heavy. So here it is in flimsy stage (though this isn't that flimsy) on the floor. I need to get a back made and get it off to the quilter. It will be nice to work with fabrics I love again, instead of t-shirts! But I am happy with the way it turned out.


Some of you have asked about the perforated paper piecing method used in the Mariner's Compass I have been working on.  I looked online and it doesn't seem to be covered anywhere. If you decide to make a Compass, I heartily recommend this book by Judy Mathieson. If you have an earlier book by her, I am told this book improves upon her methods. I just know it is easier than I ever dreamed a Mariner's Compass could be! This method can also be applied to many other patterns that would normally use foundation piecing.

If you are curious about this method, stay tuned, if not--see ya later! To get started you will need to photocopy your pattern. Along with your fabrics and usual sewing supplies, you will need to have freezer paper and a marking pen. My freezer paper roll is probably about 20 years old (no kidding) and it didn't seem to adhere to the fabrics quite as well as that of others in the class with me, but it worked well enough.


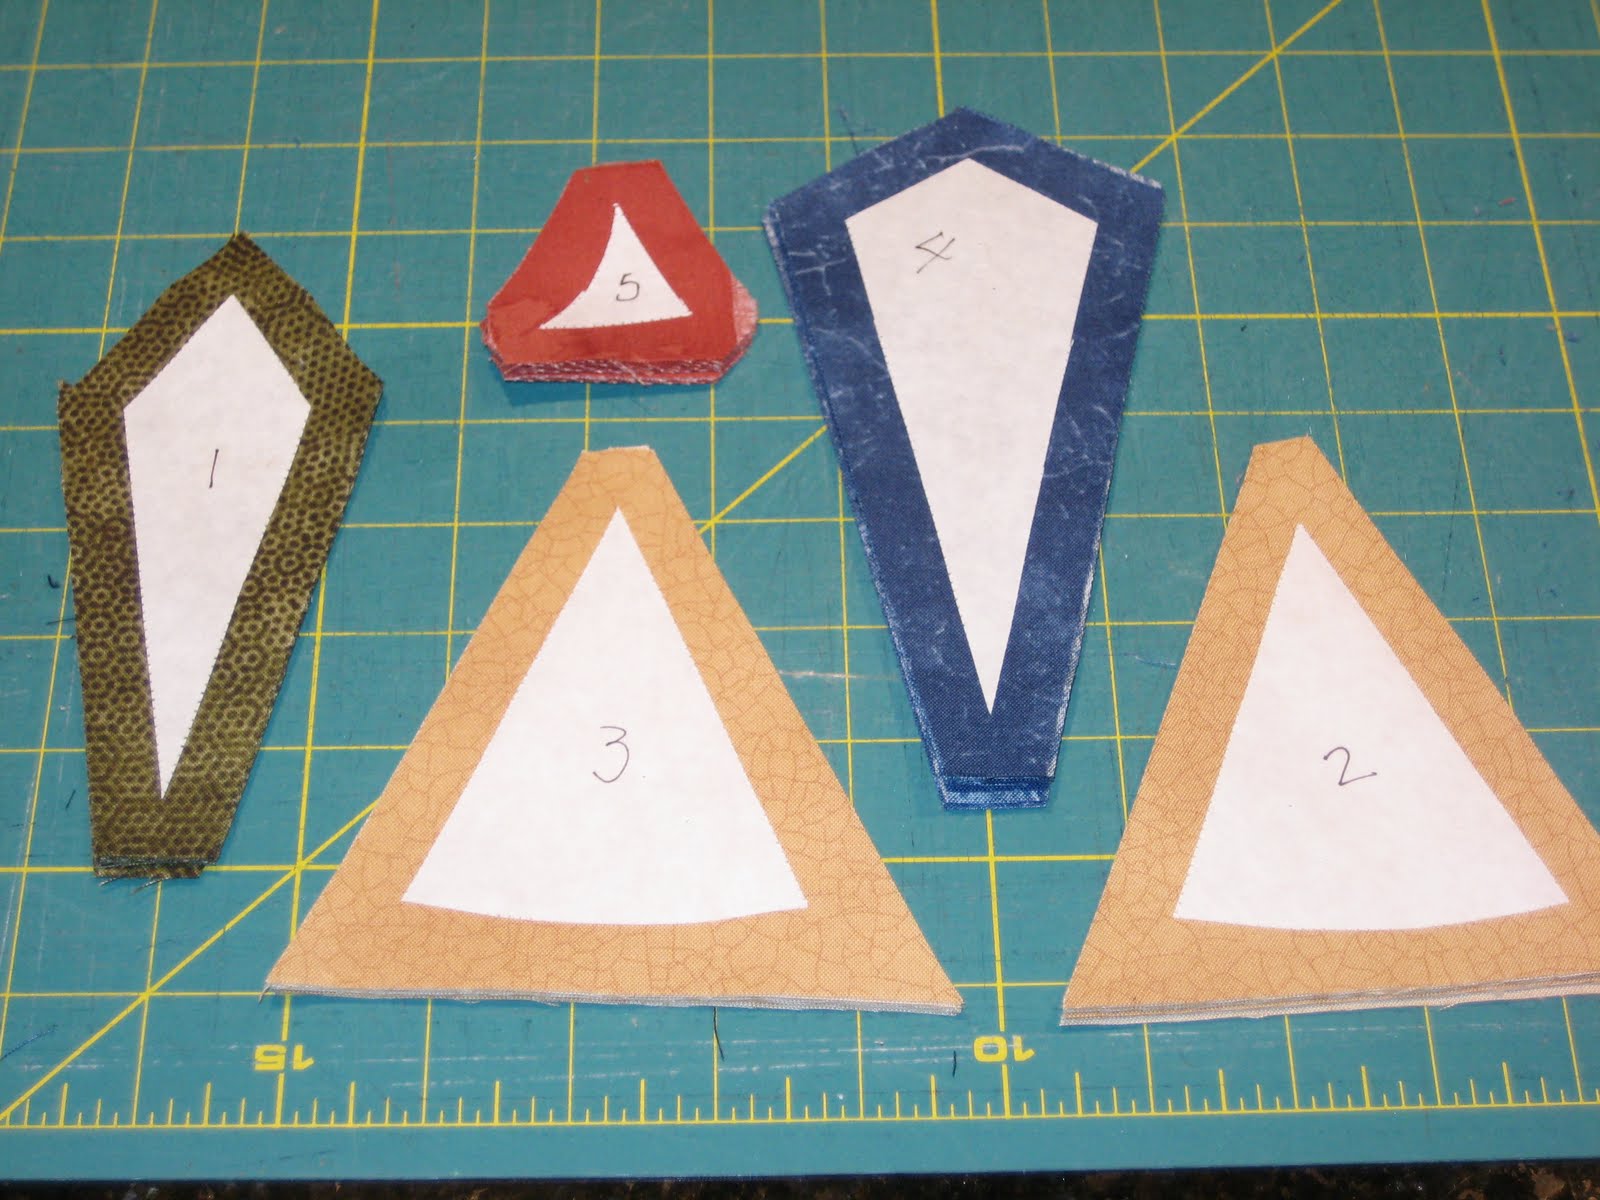
  The pattern piece shown in the photo is one eighth of the compass. You will cut 9 rectangles of the freezer paper large enough to cover the pattern--eight will be for the piecing and one will be used for cutting your fabric.

Stack your 9 pieces of freezer paper, shiny side up, and staple your photocopied pattern to them.
Remove the thread from your sewing machine needle and proceed to stitch along the lines of the pattern, leaving perforations along all of the sewing lines.
Check the back of the papers before removing the pattern piece to make sure you got all of the lines sewn.
Remove the pattern and set aside. It can be used again for making another compass. Cut out along the outside perforations of all nine pieces of freezer paper. Number the sections on the dull side of each piece, as they are on the pattern. Cut apart one of the pieces to use in cutting your fabrics. Leave the other eight intact.
Layer your fabrics (you will need eight of each piece) and press each of the cut apart pattern pieces onto the appropriate fabric.
Cut the fabrics around the pattern pieces, leaving a 1/2 inch margin around the edge of the pattern.
Take a piece of fabric from template #1. Place the wrong side of the fabric against the shiny side of one of the paper patterns, centering it over the area labeled #1. (Can you see the pretzel in my hand? I had the late night nibbles.)
Press the paper onto the fabric.
Fold back the paper along the perforation between sections #1 and #2.
Now take a piece of fabric from template #2. Place the right side of this fabric to the right side of fabric #1, making sure that it is positioned to cover the area of the folded back section #2 and leave room for seam allowances. I find holding it to a light source helps me line it up properly.
Make sure your machine is threaded again! Sew right against the folded perforation.
Trim the seam to 1/4 inch.
Open up the fabrics, fold section #2 back in place and press this section to the corresponding fabric.
Now fold along the perforation between #1 and #3. You will need to fold on up through section #4 to complete this seam. Follow the same procedure as on section #2.
Continue in this same way for sections 4 & 5.
When all sections have been sewn together, trim around the paper, leaving 1/4 inch margins.
This completes 1/8 of the compass. Repeat this process to make 7 more of these.
When all eight sections are complete, you sew them together, just lifting the paper on the edges, so they are not sewn into the seams. See all of the paper sections still in place in the photo below.
The circular flying geese units around the edge are made using the same technique.
Then you have a Mariner's Compass with geese circling and you didn't have to tear away any paper from your seams!
If you have stayed with this, please give me your input. Did it make sense to you? I know it is long, but I am a very visual learner, so I always think other people need as many pictures as I do.

Until next time, from the little mountain valley where it is just starting to feel like summer,
Janet O.

Wednesday, May 18, 2011

Remnant Rehab and Perforated Paper Piecing.

 What an alliterative title. Don't expect it on a regular basis.

How many LQSs that you know of still have remnant baskets, tables or bins? With the advent of the fat quarter, and now the fat eighth, it seems that most every little bit of fabric can be cut from a bolt, folded neatly with a printed paper wrapper and displayed in color coordinated rows--and actually cost more than the yardage price for the convenience. Nearly gone are the days when a fraction of a yard of fabric was rolled tightly and banded with a hand scrawled note of the measurement for a fraction of the original price. Happily, my LQS still offers a basket or two of these gems--though the table that used to hold a bounty of them has disappeared. Sadly, I am addicted. Wonderful, quality fabrics at 40% off and the fun of a treasure hunt in the bargain. I am a sucker for a bargain. So no matter what material need may take me into the shop, feeding the habit will always eventually find me sitting on the floor in the back corner surrounded by little fabric bundles before I finally make my way to the checkout counter.

Case in point: I have been taking a two-part class at the shop, learning to make the Mariner's Compass using the perforated paper method.  It is based on Judy Mathieson's book pictured here. May I just say that I love this method and I never dreamed a Mariner's Compass could be so easy!

Our class and homework assignments were to complete three parts that we would bring to the next class. 
The three parts I made are shown here. (No the compass points won't be cut off. The center circle, compass, and ring of flying geese are each separate and we will be attaching them in class, so they are just overlapping each other in the photo.)

My first Mariner's Compass attempt, unassembled. There will definitely be more in the future. This was fun.


Also, we are going to be putting a radiating checkerboard around it, as shown in this photo from the book. My checkerboard will not have a light color--unless you count the gold. It will be the navy, gold, green and red colors, but more texture involved.

one lone fat quarter--all I needed

So I had cut up every bit of the two gold fabrics I had pulled to make the body of the quilt and nothing else in my stash matched the tone of gold I wanted. I had to have some because I don't want a plain border and I want to incorporate all of the colors in the border I finally choose. On a quick trip to town I dropped into the shop to get ONE FAT QUARTER of gold fabric.
 

I walked in the door and was disoriented by the fact that whole aisles of fabric had been moved. When I questioned the very helpful clerk behind the counter she said they had been cleaning up and cutting up bolts that only had a little left. Some had gone into fat quarters, but they had bundled a bunch of remnants as well. REMNANTS? At the mention of the word I know my ears pricked up, and I'm not sure, but I may have started salivating, too. My feet started moving toward the back of the shop under their own power. Sure enough, where there used to be 2 large, overflowing baskets of remnants there were now three. I didn't fight the urge. I plopped down and made myself comfortable. There must have been a couple of dozen fabric bundles around me after I had pawed my way through it all. Then began the painful process of elimination. I can't ever pass up background pieces, so those were keepers--many of these remnants were full yards or more. This was a banner day! There were some fun novelties and some beautiful, warm colors that just wouldn't stay in the baskets. This is what came home with me. Is there a 12-step program for this? I only needed one fat quarter!!
Each of these is at least 1/2 yard, up to a full yard!

I love to make pillowcases for special occasions and I thought with some bright trim the dots would make a great birthday pillowcase for the grandkids to use on their pillow during their birthday week


'Til next time, from the little mountain valley where the sagebrush grows,

Janet O.