Yup, that's right. My
Easy Street is made from thrift store shirts, and that shouldn't come as any big surprise. I know I said I was planning on using repro fabrics, but since I don't start the mystery until after the reveal, when I saw
Bonnie's finish I felt it was more suited to my shirt selection than my repro stash. Other than my gold (I call it mustard) for her gray, and my more neutral background, I just subbed different shades of her same colors.

When I started in on the quilt last week I was going to cut everything for the entire quilt and then sew one full step at a time. However, after getting the first two steps cut and starting on the third, I got curious how my fabrics were going to work together. So I stopped cutting step three and cut just a few each of the rest of the steps. Then I assembled one block "A" and one block "B". I'm so glad I did. Although I really liked my shirt colors together, there just wasn't enough contrast with my purples and some of the darker blues and greens. So I dug through the shirt stash again and came up with more light blues and greens, sorted out the darker parts from the piles of things already cut, and unpicked the darker parts from the sewn blocks. I'm still not sure what the overall effect will be, since these are the only two blocks I have made, but at least the colors aren't one big dark blur.
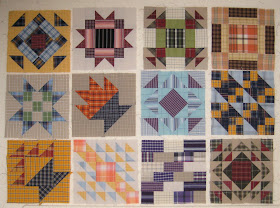
And speaking of quilts made from shirts, I have come up with the final setting for my
Barrister's Sow-Along blocks that I showed in my last post. I haven't changed the layout--I have just added the setting triangles and borders. None of it is sewn together. It is all just stuck on the design wall.

I get questions about how many shirts it takes. For the individual blocks I would just cut off a sleeve from each of the shirts I wanted to use, so there were parts of lots of shirts involved there. A "Large" size, short-sleeved shirt provided the setting triangles. The back of a shirt provided the strips for the narrow border. And the outer border is the same fabric as the setting squares. Remember I had 3 shirts of that same fabric, and I have used most of the big pieces of those shirts now, but still have plenty left that I could use in pieced blocks. I actually fussy-cut the border strips so that I could match the plaids and make the border look continuous. Some of you may groan or roll your eyes, but that is part of my obsessive nature and I have learned to live with it--even embrace it. : ) I hope to have this top to flimsy stage by the end of the month. I'm only doing a row or two at a time because I need to focus on making my Mom's birthday present that I mentioned in my previous post.
You can imagine that with all of the shirt work going on around here that my sewing room looks like an explosion in a shirt factory. Gotta do something about that.
Finally, I did get my BOM, Random Roses in Jamestown (because I used random rose fabrics I had collected for a few years), blocks all made last year (thanks to
Teresa's loan of her acrylic templates). Though the pattern uses log cabin blocks for setting squares, I think I am going to use some sort of chain block. I just really like chains for setting squares.
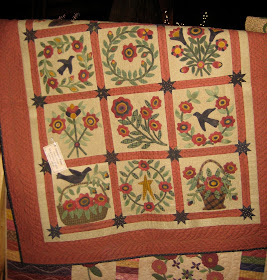
If you are familiar with this pattern, you are aware that it is a Marti Michell BOM only offered through quilt shops. You cannot just go out and buy the pattern. This is what the pattern actually looks like. I pulled this photo from the web.
The same "Jamestown" pattern has most recently been reincarnated as the "Stonehenge meets Jamestown" BOM--same pattern, different fabrics. I received the pattern from
Marj when she offered it on her blog after finishing with it. I am going to do the same. If you are interested in receiving this pattern, let me know in your comment. If more than one would like it, I will draw the name.
BTW, the pattern does include paper templates, but it does make up easier if you have Marti Michell templates, sets A & C.
That's it for now. Until next time,
Janet O.
