Saturday, November 5, 2016

Lots of Fall Projects--and a little fun

This Buttermilk Basin Pattern, "Give Thanks", is finally ready to be basted and quilted. I shrunk the pattern, so what would have been 42" x 50" is now almost 25", by just over 26". I made mine a little more of a square.

I had SO much trouble trying to choose borders for this. The wovens and plaids I had just didn't work. Still not sure I made the right choice, but after auditioning every combination of Fall colors under the sun, in a variety of fabrics, this is what stuck. I only had a small piece of the outer border and ended up having to piece the top and bottom. It is most obvious on the bottom.

I still do pumpkins in November. I have these two smaller projects basted and ready to quilt. The stems on the two little pumpkins in the basket were too pale, if you recall, but they were also too well fused to be removed. So I took a brown Pigma pen and lightly shaded them to give a little more contrast with the background. We do what we have to do!


My version of Lori's Quilters Madder is also ready for basting and quilting. I did put the HSTs all around. Down the sides the measurements worked out well with the border, but across the top and bottom, not so much. After wrestling and wrangling to make them fit, I did the truly "humble quilt" thing and chopped off the borders.
I really like this little quilt. Madders warm my heart! When I was choosing fabrics for the border I found a gorgeous madder paisley that a friend had given me. It isn't as obvious all chopped up, but it is so pretty (the quilt Lori used as inspiration had a chopped up madder paisley in the border HSTs). There was no selvage, so I didn't know what it was. I sent off a photo to Cyndi and I was able to get a couple more yards from her shop. Thank you, Cyndi!


Again, I made the blocks half the size of the original. After quilting this will probably end up being about 14" x 17".
I read on Marian's blog that this is the 7th SAL she has done with Lori. That made me think of how many I have made. Since I started following Lori in 2011 I have only skipped one of them, and a couple of times I made two. Thinking this might be my eighth SAL with her.  I have created some of my favorite quilts from these opportunities.


The only real "finish" I have here is my little turkey pillow from my fusible test. This was also from a Buttermilk Basin pattern--a pincushion, I believe.


Finally, I am doing another "really out of character for me" project (like the Floating Foxes from last year), but I LOVE it.  Joanne, over at Canuckquilter, has designed such a fun baby quilt pattern called Tic Tac Who? There are three versions--Tic Tac Quack, with a duck; Tic Tac Woof, with a dog; and Tic Tac Hoot, with an owl. They are all so sweet, but I was especially drawn to the owl. When she asked for pattern testers, I couldn't help myself, even though I usually don't do such things. And look at the size of those blocks--8"! I've made quilts smaller than that! *LOL* It was really fun to make progress in bigger leaps and bounds for a change!

I started the cutting on Monday night, began the sewing Tuesday night, and have squeezed in a few hours each day. Last night I got it down to just needing the borders attached. The lighting on the photo isn't the best, but the background is a tan with cream dots. I may add a green outer border to make it a tad bigger. Joanne hopes to have the pattern ready for sales soon--possibly next month. I have to say that her directions are very clear and concise. Everything went together very smoothly!
Thanks, Joanne, for letting me play with your pattern. I may have to make the Woof version down the road.

I have held drawings for the books offered in my last post. Winners are as follows:
Rachel's Reel--Summer
For All Seasons--Raewyn
Prairie Flowers Encore--Doniene
Emma's Courtyard--Gale
If you are named above, please contact me with your address so I can get them sent your way. If I don't hear from you by Tuesday, Nov. 8th (U.S. Election Day) I will draw another name.
Until next time, Janet O.
 

Thursday, October 27, 2016

A Light In The Window, etc., etc., etc.

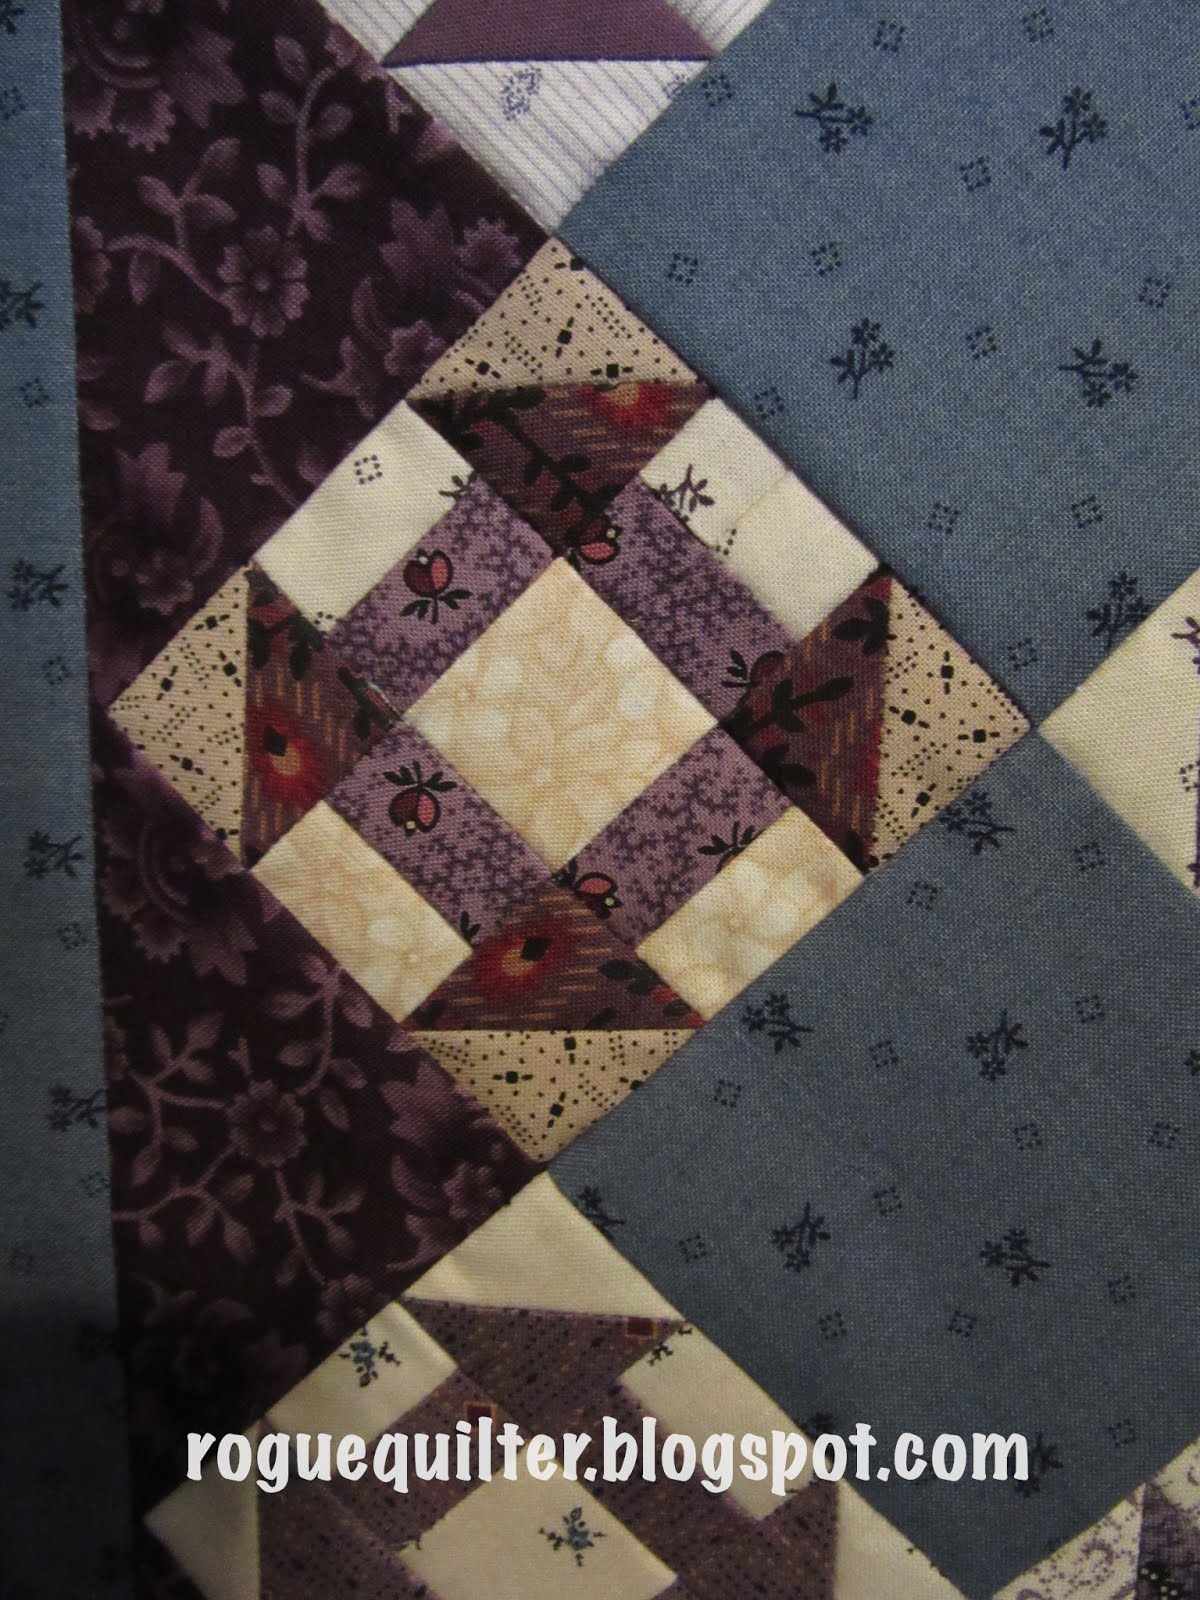
This is a pattern from Journey Three of Pam Buda's Prairie Women's Sewing Circle. I have been wanting to make it for a long time, and when I saw her new Old Plum Calico line I knew that was what I had been waiting for. Several of you guessed correctly that I was referring to Pam's new line in my last post--and one of you even guessed the churn dash block!

Pam had sent me some small cuttings of the fabric before it was released to the public, and I started making the churn dash blocks right away. 
She had asked that I not share it until the fabric was available, so I held off posting.
Pam is a proponent of the "make do" philosophy of our prairie fore-mothers, and wrote into the instructions to make 3 "make do" blocks in the 20 that the pattern calls for.


I had decided that I would make as many blocks as the cuttings she had sent would make, no matter how much "making do" I had to do. As it turned out, I was able to squeeze out 13 blocks--five being "make do", and one of those five being extremely "make do". Thirteen is a hard number to put into a quilt, so I settled on 12 blocks, leaving the extreme "make do" block for something else.

When Pam offered a pre-order special on fat eighths and fat quarter bundles of her Old Plum Calico line I didn't hesitate to order a fat eighth bundle (that is a splurge for me). As I was making the blocks I decided to wait until the bundle arrived to make the setting triangles and borders.

The original is in blues and greens. I had decided to replace the blues with purples, and though I love purple and green together, I wanted to use a blue where her green had been. I was hoping for a lighter blue repro, but couldn't find one that clicked for me. I finally settled on this medium blue that is from another one of Pam's lines.

Between the cuttings from Pam and the fat eighth piece I was able to make all of the setting triangles out of the same fabric. When it came to the border I had to make two of them from one fabric and two from another. That is okay with me. I like that look.

I am really happy with my "Light In The Window". Now it goes into my greatly diminished, but still growing "to-be-quilted minis" pile.

I fell behind immediately on my Quilters Madder (SAL at humblequilts blog) project. Spent the past couple of days trying to catch up. As usual, I complicated things.

I made the blocks half the size in the pattern (surprised, right?). It will finish at about 15" x 18".  I also added a row, and I included the HSTs on the two sides as in the inspiration photo Lori shared. 
My seam ripper has kept me company on this project. I have miscalculated many things in adjusting the block sizes, and had to make one whole step over again. There were also a few blocks that I had turned the wrong way and it just looked too busy and crazy to me to leave it that way. 
What I love most about this project is that it contains bits and pieces of fabrics from three special friends I have "met" through blogging.
I have decided that I will put the HSTs on the top and bottom, too. They are in the works.


Speaking of things from friends, Karen (logcabinquilter blog) sent me some "scraps" (I use the term loosely), and included these sweet little applique blocks from a project for which she had lost her steam. I don't do needle-turned applique, but am in awe of those that do. Each of these sweet blocks will receive a border and be made into a little seasonal wall hanging. They are each about 8" square, and I will try to keep them to about 12" finished. Thank you, Karen! What a treasure.


Also, last year I received a box full of Jo Morton patterns from a friend that was dying of cancer. I finally went through them carefully and realized that I should pass the applique patterns to someone that will make good use of them.

If there is a lot of interest I will draw names for the individual books, so if you would like to be included, please indicate in your comment which titles interest you.

Until next time,
Janet O.

Drawing Closed!

Friday, October 14, 2016

What do you think?

Is it possible to label quilts without labeling them? I think so. See these quilts?
View from the loft of 34 of the 43 little quilts finished this year. The other 9 have been gifted.
These are all of the little quilts that I have finished so far this year, that haven't been given away.  I have sewn a label on every single one! I am so good that way.  Where I am not so good is actually writing on the label. This is how the backs of these quilts appear--this is just a sampling.
 
Lovely and pristine, aren't they? Kind of hate to spoil it by actually writing on them. : )

As I began to gather the quilts from their various resting places around the house, to my horror I discovered that some little quilts I finished LAST year also sported naked labels. Shocking!
How did this happen under my watchful eye? Oh, I remember now. When the last stitch has been taken on the binding, I always tell myself I will fill in the label in a little while--and then I never seem to get to it, unless I am giving it away.

So ALL of these embarrassingly bare quilts (45 of them) were gathered and stacked on the dining room table.
 

Let the labeling begin!! I have had to spend much time scrolling through my blog to make sure the info I am putting on the labels is correct. Good thing it was all documented somewhere!

I don't worry about having a beautiful label, but I do believe in labeling quilts--eventually. Whew--1/3 of them are done now. I needed a break.

So I turned my attention to some wool work. Poor photo, but it shows that progress has been made.
 

This is all sewn together and is about 15" x 19" inches right now. Needs borders.


Will put a second border on this. Almost added a cheddar border, but now I'm not sure. I need to audition a few more Fall colors before deciding. This photo shows me I should have used a darker green on the pumpkin stems.


My swap partner in Randy's pincushion swap has finally received the package I sent her, so I can share it with you. I made a boxy-style mini log cabin pincushion for Joy at The Joyful Quilter blog.
I added a package of my handcrafted soap. You can't tell through the packaging, but one soap is a spider (cute, not spooky), and the other one is a web.  Just the things you would want to use for washing up, right?


Randy and I kind of ended up swapping pincushions as well, unofficially. I sent her one with the little quilt swap we just did, and she returned the favor with this little red/white beauty, wrapped lovingly in some strips of fabric that you know will find their way into little quilts. : )


I remembered to get a photo of my "80 minutes a week" challenge project before it was all gone. Another success! Gluten Free Orange Pecan bread. Yum!! (Actually, the recipe is for Orange Walnut Bread, but I am allergic to walnuts.)

Something is in the works that I hope to share soon. It involves a newly released fabric line in my favorite color, and one of my most favorite quilt blocks.

Until next time,
Janet O.


Friday, October 7, 2016

Closure on a swap, a test, and a quest

I participated in Randy's (barristersblock blog) pincushion swap and I received mine today. I was gobsmacked! Look at this beauty made by Kevin (kevinthequilter blog! And the back is a gorgeous solid cheddar. The photo doesn't begin to do it justice!
Kevin had emailed and asked me about my favorite colors, etc. I told him I loved CW repros and purple was my favorite color. I liked to combine it with gold/cheddar, and I would often throw some black in, too. He already seemed to know that I dabble in minis.
Did he nail it or what? I couldn't be more thrilled! It has taken up residence right by my sewing machine and has already been put to use. Makes me smile every time I see it. : )
This brings closure to my first ever group swap, and it was a grand success on my end of things. I hope the one I sent has been received.

My fusible test turned out to be a much bigger venture than I had anticipated. Rather than bore you with a long, wordy post here, I placed it as a tab under my header. If you are interested in the results, you can read it on the "Fusible Review" tab.


I will share with you all of the projects that came about as I tested the fusibles.

 This little piece is a "Front Porch Quilts" design.


                                                                                        It finishes at about 3"x7".


One of the Buttermilk Basin "Banners Through The Year" series. The pattern recommended an orange border, and I love orange. But when I was auditioning fabrics, this older Sandy Gervais print just begged to be chosen.


This is another Buttermilk Basin pattern. It will be a pillow for bowl filling. It is smaller than it looks. : )


Another Buttermilk Basin design that will be another little bowl filler pillow.  


I have three of the four blocks stitched down on this Buttermilk Basin pattern. (Can you tell I have taken a few classes from Stacy? I sure have a stash of her patterns!)

I saved the most involved block of this pattern for last. Don't know if that was the smartest move I could have made. I'm really hoping to have this ready for the holiday next month. 


This is an adaptation of a pattern by Bird in The Hand Primitives. I wanted something that would fit on this piece of wool, so I consolidated it a bit. There isn't any stitching on this yet, but I believe it will really come to life when that is completed.

As for closure on a quest, some of you know that over 1 1/2 years ago I was diagnosed with celiac disease. This was quite a blow. I loved to bake.

My first attempts at gluten free baking were dismal. I lost my baking mojo and for months at a time I would do no baking. Gradually I started to assemble a very small arsenal of recipes that were tolerable, but as someone who used to volunteer to provide baked goods whenever they were needed, I now avoided having to share the gritty, starchy products from my kitchen. Oh, to have a really good chocolate chip cookie again!
This is a shelf in my fridge.
Well, I have accepted Nancy's challenge to spend 80  minutes a week learning a new skill or working on a goal. I have gathered my courage and my gluten free flours and tackled a few recipes that have been taunting me, and I finally did it!!! 
I have finally made a gluten free chocolate chip cookie that doesn't taste like it is gluten free! No gritty texture, no starchy aftertaste, and it is soft and chewy, like a chocolate chip cookie should be!
 

I was elated! I finally had to freeze the rest of them because I was going to consume the whole batch if I didn't. It had been almost two years since I'd had a good chocolate chip cookie. 

And on that sweet note, I will close--
Until next time,
Janet O.


Friday, September 30, 2016

Maybe next time

I have been working on the fusible comparisons and hoped this post would include the results. But my testing just raised more questions, so I am trying out a couple more things before posting any results. So hopefully my next post will have the results for you.

In the meantime, there has been another little finish--this is small quilt finish number #43 for the year.
 This little brick quilt was made from leftovers from the swap I did with Randy.


I quilted it with the 1" clamshell stencil I bought at HMQS last May. It has sure come in handy for little quilt finishes. And I love the backing fabric on this. It was the leftover from the backing I put on Randy's quilt. I had to border it to fit this quilt, but I really like the way the bird centered in it.

I got the borders around the little Kim Diehl wool piece. I hand quilted the first little quilt I made from this pattern and now I am debating if I should do that again, or just machine quilt it and be done!

The first block of the Buttermilk Basin "Give Thanks" wall hanging is finished. Actually I finished stitching down the words, too, but I am too lazy to go get a photo.


This is one of three new small wool projects, as of tonight.
I haven't fused the other two down yet. I will be comparing the performance of the fusible products as I stitch up these projects. I decided one little wool bird was not enough stitching to get a feel for the performance of each product.

Gorgeous sunset last night--just wanted to share it.

Until next time, 
Janet O.

Saturday, September 24, 2016

Sewing machine is gathering dust

...while I play in wool. This is what I have pulled together in the past couple of days.
Nothing is fused yet. I just got all of the pieces cut out and laid on their respective backgrounds to see if they were happy there. I see that the crookneck squash doesn't have much contrast with its background, but I don't know if I will change it. I really like that piece of wool.


This is from a Buttermilk Basin pattern that I ordered a while back when Stacy had a sale. I've wanted a Thanksgiving wall hanging and when I saw this, I thought it was perfect. But I had not looked carefully at the size before I ordered.
With the sloping outer walls of our dome, the places where I can hang things are limited. Quilts need to be kept to under 3' square.
This pattern is for a 42.5" x 50.5" wall hanging.
I was sad, and stuffed the pattern deep in a drawer.
But as I have been up to my elbows in Kool-Aid lately, dying wool, I have come up with some rich colors that had me wanting to do something Fall-ish.


I have gone through so much Kool-Aid this week, I have had to replenish my supply twice. I wonder if the clerks at the store think I am addicted (I don't even drink the stuff). I have raised suspicions before when buying large quantities of lye for soap making (since it is also used in meth labs). But as far as I know there aren't nefarious activities associated with Kool-Aid (but even as I typed that, Jim Jones came to mind). (That was quite a parenthetical paragraph. Uh-oh, I am posting late at night again. Can you tell?)

I decided to dig out the pattern and reduce the designs. With the help of my scanner and printer, I believe it will work out to under 30" square once the borders are attached.
Excuse the glaring light over my kitchen island. Maybe this gives you some perspective, considering the pattern beside it is standard 8 1/2" x 11".  I think it will be very cute. : )
Half of the wools I used for this piece are from thrift store clothing, and then many of them were tea-dyed, or took a bath in Kool-Aid.

Another change I made, besides the size, is in Mr. Gobbler's coloring. If you compare the pattern with my Tom Turkey, you can see mine is not so pale.
Though the soft and creamy turkey on the pattern is pretty, we have wild turkeys in our area, and their complexions aren't that nice. Of course, I haven't seen one wearing a hat either, but I still included that.

For at least a couple of years now I have been wanting to run a side-by-side comparison of the fusible products different instructors use for wool applique. Lisa Bongean recommends Lite Steam-a-Seam 2, Stacy West is in favor of Soft Fuse, and Kim Diehl uses Heat'nBond Lite. Then there is one called TransWeb, that I hadn't heard of until my friend Kris introduced me to it.
So I divided a muslin square into quarters and used a different fusible in each one to attach an identical wool bird. I kept notes on the different properties of each one up to this point. Next step is to stitch around the edges and see what differences I can detect there. I already know from experience some of what I will find, but I am curious to get a feel for each of the four products. I'll let you know what I learn.

Until next time,
Janet O.