Saturday, October 31, 2015

A little late to the (Halloween) party...

... but Julie, this is for you--a fulfillment of your request for pictures of Halloween quilts and decor.
Most of the Halloween stuff has been posted in years past, but here we go again. I struggle to divide the Fall quilts and decor from Halloween, since they seem to trip over each other in occurrence. It felt like Summer all through September this year, so the Fall decorations didn't even cross my mind, until we were halfway through October. You are going to get a mix here, which is often how it happens at my house, anyway.
"Poor Li'l Punky Loves Pineapple" was made using Julie Letvin's Poor Li'l Punky pincushion pattern (Look on page 5 of her "Let's go shopping" header).


I did actually make Punky pincushions, too. Here are the four I made, but three of them were gifted.


 This Poor Li'l Punky is the only one that remains at my house.


October Lamb for All Seasons, adapted from  Lisa Bongean's Old Glory Gatherings pattern.

And this is the Fall quilt adapted from the same pattern. 
 
 You've already seen Linus in his pumpkin patch. Those pumpkins grow all over the place.


The Candy Corn banner in my dining room was made by DD#2.

Little Halloween quilts tucked here and there. "Dark and Stormy Night" and "Pumpkin Patch"


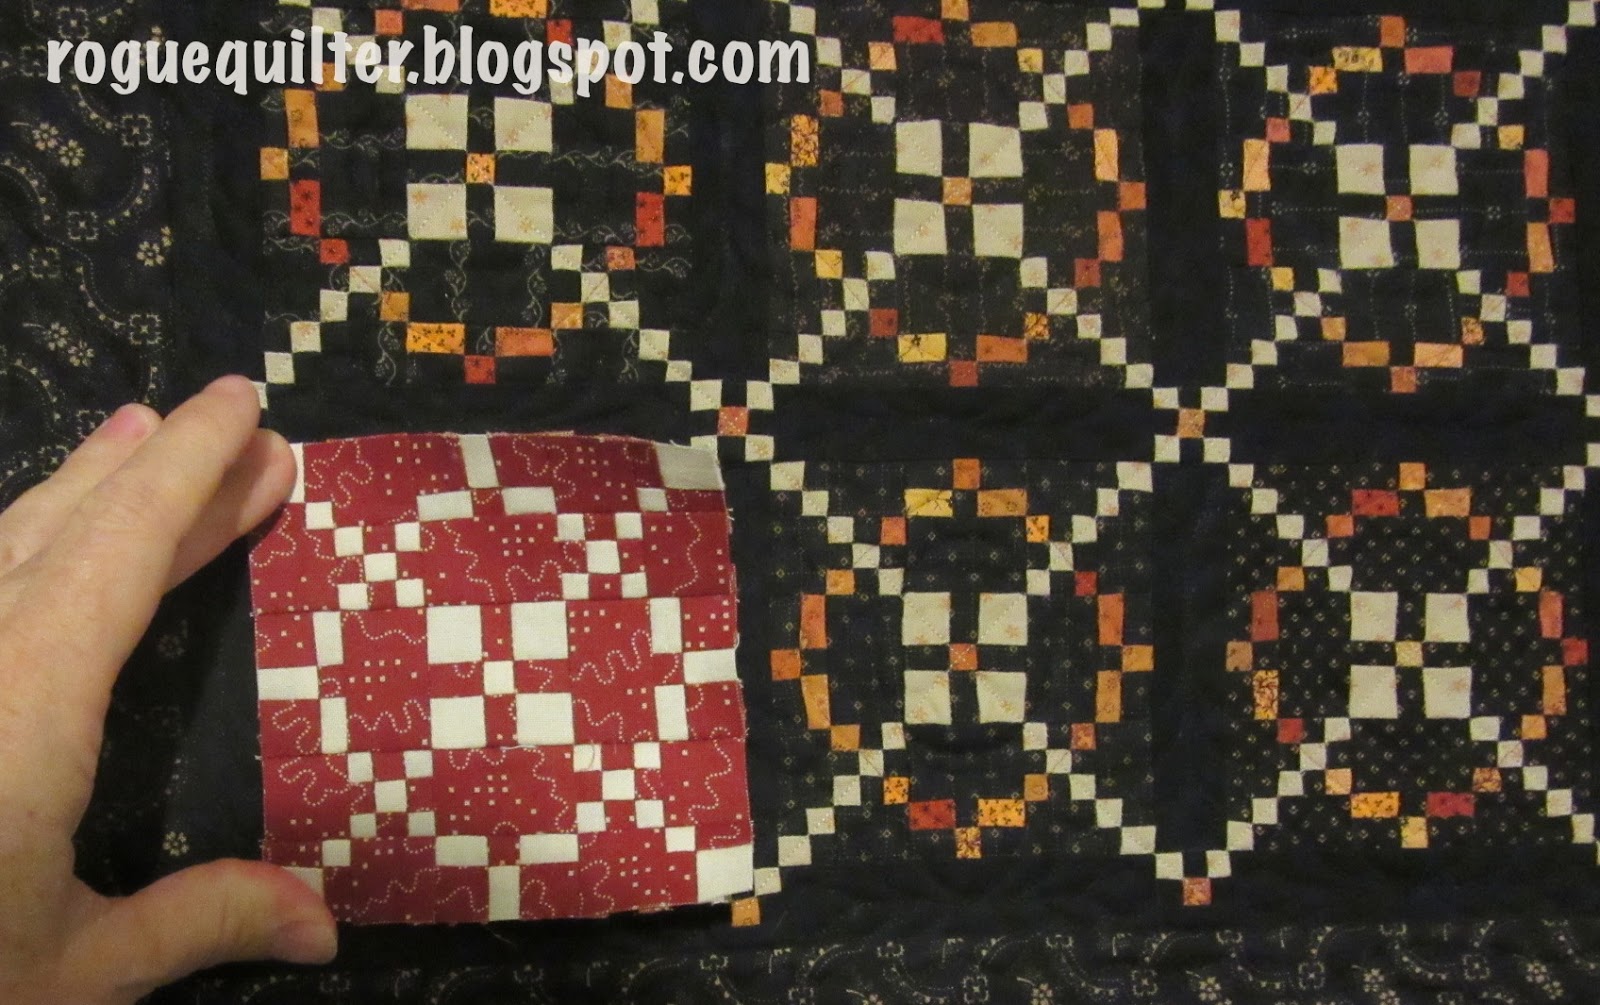
I didn't make this as a Halloween quilt, but it seems to fit. "Burgoyne Strikes Gold"

These two little Fall quilts hang in my kitchen. "Autumn Afternoon" and "Tumbling in the Leaves"


This flimsy is made from leftover HSTs from a hands-on experience at a LQS after a Carmen Geddes demo last year. As we were making one large leaf block for a hotpad, the shop owner said we could throw away the cut off HSTs. I think I whimpered and she laughed and said, "Or you can give them to Janet."
I made the blocks last year, but just barely stitched up the top yesterday. Maybe by next year it will be quilted. : )
Haven't named it yet. The larger leaves finish at 3", the smaller ones are 2 1/2". 
I need to get it finished so I can fill this little ladder with Fall colored quilts. Right now it is two out of three. I keep my seasonal children's books in that little trunk for when the grandchildren visit.
That is all for the seasonal stuff. Update on current projects...


"Floating Foxes" was completed in time for the birthday. It was on the bed of granddaughter Abby when she came home from school. : ) Even got the matching pillowcase made.


My red/white Burgoyne Surrounded is so much easier to put together than the scrappy "Burgoyne Strikes Gold". Second block was completed last night. I've even found a red that isn't quite solid, that I think I will like as the sashing. Have been out of my little valley a couple of times this week and managed to squeeze in visits to a couple of favorite quilt shops, Village Dry Goods (in Brigham City, UT) and Elaine's Quilt Block (in Cottonwood Heights, UT). If you are traveling through Northern Utah, I highly recommend them both.

Until next time,
Janet O.

Sunday, October 25, 2015

A finish! (and more starts--but we won't dwell on that.)

This basket in the photo corrals the little quilts that are usually decorating my home, but must be moved to make way for holiday decorations. So they found a home in the corner of my sewing room until all of the end-of-year seasonal stuff is over.
My little thimble quilt is finished. I'm calling it "Busy Little Thimbles."
This is made from some fabrics I received from Cyndi of Busy Thimble blog and quilt shop, after I had visited her shop in Maine back in August. It is a nice little reminder of a wonderful visit to Cyndi's delightful shop!
I used a clamshell ruler  on Gidget to do the quilting. Shows up better on the back.

What possessed me to think I could squeeze in Pam Buda's Pocket Patchwork SAL? See what happens when you rush? I turned my star points in the wrong direction!! Why didn't I see that until it was all sewn together? It is staying!


Finished up the stitching on my version of Buttermilk Basin's Mystery BOM for October. I had decided early on that my signature on each block would be a little button. I was hard pressed to come up with a place to put a button on this block, until I decided to add the bat. Now he has a little round button body. : )


 And I'm not sure how this happened, but I spent a good part of Saturday evening cutting. I will be making my very first red/white quilt. I actually prefer blue and white, but in 2017 our state quilt guild is celebrating it's 40th (Ruby) anniversary and they are sponsoring a red/white quilt show to travel the state that year. The only "judging" will be a viewer's choice. Sounds very non-intimidating, so I thought it might be fun to participate in the mini division.
 This mess you see on  the design board will eventually be turned into a bunch of these little blocks.

 It is amazing how much more quickly these blocks can go together when you are only using two fabrics. You can actually strip piece, unlike when I made my Burgoyne Strikes Gold scrappy version.
I am using the same size blocks, as you can see, but I think I may only do 9 in red/white, before I am going to be dying to work with more color! So this will most likely be a square quilt. : )

BTW, I am over halfway finished binding the Floating Foxes!!

Until next time, 
Janet O.

Wednesday, October 21, 2015

Country Roads and Floating Foxes

Lori is having a link-up for her Country Roads SAL and I actually have both of my versions finished in time.

Here is the first one after I got the ubiquitous black binding attached.

 I decided to mix up the second one. I quilted it quite differently, after the stitch-in-the-ditch.
I put cross-hatching in the setting triangles, and I did itty-bitty feathered wreaths in the setting squares (that gave me fits--I had to unpick two of them). You can see it all better from the back. And I didn't bind this one in black, either. It looks like it, I know, but it is a dark purple.

You may recall that I made my versions half the size of Lori's original, so that made the wreaths smaller than I have ever tried. Here you see the finished quilts with a 5" charm pack to get a little perspective.

This made the wreaths 2"! I used a stencil--I have not gained enough skill and confidence to free-hand those things (probably never will).

I want to share something with you about the feathers on stencils. It is something I have noticed over the years that I have worked on feathers and I thought I would give a little insight.


When you trace a stencil from a wreath you often end up with something like this.


You can see the arrows pointing out all of the gaps needed in order to keep the stencil together.

This sample is from a 3 inch feathered wreath--it was a little easier to show you than on the 2 inch wreath, though the pattern is exactly the same.

I typically fill in the gaps with whatever type of marker I am using on the quilt, for ease of flow as I quilt. For this purpose I have used a red pencil on the paper to fill in the lines. I think the photo here shows what is typically done to fill in gaps. It makes a nice feathered wreath, but something about it has always bothered me.
 As I studied free-hand feathers I realized the stencil tended to create a less graceful feather shape. The stencil design below is filled in with lines that create more of the free-hand shaped feather.
Can you see the difference?
Try comparing here.
If you are still scratching your head trying to decide what is different, maybe this will help.
Can you see how the top feathers are shaped like a teardrop and the lower ones have a shape all their own? There is no right or wrong shape and I haven't notified the quilt police to be on the lookout for malformed feathers, I have just found the teardrop shape to please my eye more and look more like the free-hand feathers I was taught to make. You quilt your feathers however you would like and they will look lovely no matter! : )

Enough of that, let's float some foxes! Gidget worked hard and got it all quilted.


 Abby's name even found its way into the quilting. You can almost see it here. : )


All of the faces got furry cheeks, swirly eyes, and loops on the nose.


Stippling finished the background of the fox blocks. 


The grey diagonals received VERY crooked organic lines, spaced 2 or 3 fingers apart.

A swirly pattern that incorporated hooks and eyelashes as fillers covered the aqua diagonals.

I have a teal fabric for the binding and there is still a week before the birthday, so hopefully I will get it finished, even though I am the world's slowest binder.  

The fox pattern is by Elizabeth Hartman, and comes in several sizes. I used Fancy Fox II, making the less gigantic of the two blocks in the pattern. For smaller foxes choose the original Fancy Fox pattern. (These links are for PDF downloads.)
Until next time,
Janet O.


Wednesday, October 14, 2015

A hodgepodge of projects and a little seasonal decor.


A few years ago I made dozens of fabric pumpkins. I always thought it would be fun to have Linus in the midst of them. This year I found a ceramic Linus figure at a thrift shop, but he was painted all wrong. Having painted ceramics profusely in a former life, I brought him home to repaint. My hands are not as steady as they used to be and it took me SO MUCH LONGER than I planned!
And when it finally came down to putting the stripes on his shirt, I used a Micron Pigma pen. The hair gave me enough grief with the tiny paintbrush. I wasn't going to attempt the stripes that way, too. But I am pleased to finally have Linus in the pumpkin patch, awaiting the Great Pumpkin! : )

"Floating Foxes" is under the needle. I am making it up as I go along. I have some of my quilt design reference books handy and when I get stumped, I flip through and find something I think might work. Then I try it on a practice sandwich before actually putting it on the quilt.

After basting this quilt, as I stood in the loft to take the photo, I thought it looked like the foxes were at a New Year's celebration at midnight, with confetti fluttering through the air. If you are not familiar with the pin covers I am using here, and you pin baste your quilts for FMQ, you may want to check them out.

I use the pin covers for a few reasons.
First, with the pin covers on, and using the Kwik Klip tool, I do not experience the hand fatigue I used to get when pin basting a quilt.
Second, while free motion quilting, I am always able to spot my pins and have never run into a pin (which can hurt your machine) while using them.
Third, while quilting, it is easier to grasp and remove the pins as I quilt, when they have these covers on them.
Fourth, you can leave the pins open when not in use. With the covers on, they do not get all tangled up, so it saves even more hand stress, and saves time. I do not have to open each pin as I baste, and I do not have to close them to put them away.

My first Country Roads from Lori's SAL is quilted and waiting for binding. I was going to use red, because I feel like I overuse black. But my personal research indicates that I didn't like the red as well, so it will be black--again!

The grid lines through the green chains seem to dominate the quilting. From the front you can't even tell that I have quilted around the black rectangles.

I had some tension issues that I didn't see until I was finished. I once told myself that I could no longer quilt black-on-black at night. Well, apparently I should be barred from any thread that perfectly matches the fabric. My top thread lays a little flat in many areas, but at the moment I am not inclined to unpick--too busy chasing foxes around my quilting table!


Caught up with the Buttermilk Basin Mystery BOM.  My sunflower is not as disciplined as Miss Stacy's. It is a bit tipsy--by design (or maybe it isn't just water in that jar).


October's block should post this week. I seem to recall that at the start of this Stacy had said there would be 11 blocks. I am really curious as to how we will be setting 11 blocks.
Here are my 9 blocks so far.


Block #9 for the Attic Heirlooms Ornament of the Month is completed now. Number 10 has posted, but I don't know that I will go any farther.

Obviously, I have not been making mine into ornaments. I have cut my blocks at 4 1/2", so they will finish at 4".


The fabric I have appliqued onto is from a thrift store shirt, so it made sense to me to finish the top with repurposed fabrics from shirts. Just played with it a little bit last night, and this is what I am thinking of doing. May add another red plaid as an outer border, if I can find one that doesn't overpower the whole thing. It will only be about 15" square without the added border.
I think I am happy with it as is, and would like to have it finished before the holidays get underway, rather than be waiting for another block to post so I can get it made.

Well, the foxes are waiting for me. I'd better get back to them.
Until next time,
Janet O.